Wednesday 24 April 2024

Wireshark network monitoring : 2 : Wifi, Magic Ports and Ethernet


In part one of this blog I refreshed my knowledge of wireshark by analysing traffic between a Windows PC browser session and a web-site.  In practice my principal requirement is to analyse traffic from iPad apps to determine how they control the Denon amplifier and Pure Jongo funxtions.


Plan A : Wifi monitoring

The obvious way to capture packets is to use a "promiscous" wifi connection.  By default ethernet adapters only pass relevant packets relevant to the attached computer.  However if the ethernet adapter is in "promiscous" mode it can pass all packets for all devices on the ethernet LAN segment to the host.  Unfortunately my ethernet card doesn't support promiscous (aka monitor) mode for wireshark packet capture.

Similarly it is sometimes possible to put a wifi adapter into monitor mode and capture packets relating to all devices using a network.   Wireshark documentation makes it clear this isn't easy.


Following the wireshark instructions I check my Windows PC wifi adapter but it wasn't suitable for monitor mode.  I then purchased a new wifi dongle which appeared to support monitor mode.  Despite trying it on Windows and Linux there was no way I could get it into monitor mode.  As I investigated a bit further the only instance I found of the card being used in monitor mode is with Kali Linux (used for network hacking and penetration testing), and it may have been necessary to have a special Kali configuration to achieve that.


On the basis that wifi monitoring is a specialised and difficult thing to do I decided not to investigate this avenue further.


Plan B : Proxy Server


Having given up on a wifi adapter the next idea was to direct traffic from the iPad via a proxy server on the PC to Denon / Pure devices.  This is the approach used previously whereby I pointed the iPad at a Proxy Server running within Fiddler Everywhere which then forwarded packets to Denon.

There are a wide variety of Proxy Server configurations / uses.  Often they are geared towards passing information from all local devices through to the internet.  I wasn't able to find a suitable Windows proxy software program which looked likely to do what I wanted.  If I want to progress this idea it would be better for me to use the solution which Fiddler Everywhere provides.  A couple of weeks after my investigation I came across mitmproxy a HTTPS proxy application for Linux/Windows which  may be a good solution.

Other approaches are available to route packets via the PC so that they can be captured.  For example, tt is possible that a wifi hotspot running on Windows will enable wifi packets to be captured.  Again it is something I have not yet investigated.

Plan C : Mirror Port


One of the main issues with monitoring ethernet devices is that usually wireshark (and other software) can only capture packets which are addressed to the host PC.  Network switches often have a feature called mirror ports which allow you to configure an ethernet port so that it receives a copy of traffic passing through another port on the same switch.  I was pleasantly surprised to find that this feature is available on a cheap home hub so I purchased a suitable device.

My Denon amplifier has an ethernet socket as well as wifi so I connected my PC and amplifier to the hub, then configured the amplifier port so that it mirrored to the PC port.

The result is very impressive, I can now easily see all the commands used to control the Denon amplifier as they are sent from the Denon / Heos iPad apps and the responses sent back to the iPad.
For example, looking at the traffic captured above I see that the IPad is sending / receiving HTTP/XML packets.  Looking at packet 2415 from the iPad I see that it contains an XML command requesting "current track position" info from Denon.  I can send similar commands from a python script do do the same thing and thereby add current track position information to my web page used to control Denon.

Plan D : iPad Ethernet cable


Plan C was a great step forward, we have an easy way of capturing packets from any ethernet device which is close to the switch / PC.
I still have a problem with Pure Jongos.  I use Jongos for multi-room audio.  They allow you to stream audio to a number of devices and synchronise the sound so that you can move from room to room listening to music.  As well as being a fraction of the cost of Sonos devices I can use Jongos to play music on my Denon amplifier and Yamaha soundbar in addition to Jongo smart speakers.
Although Jongos use the uPnp protocol I have not been able determine how to program them for multi-room audio.  I am reliant on an iPad app to choose the music and synchronising playing - this is very irritating.  As neither the iPad or Jongos have ethernet interfaces Plan C doesn't help me.

The solution turned out to be quite straighforward.  I purchased a cheap iPad ethernet cable and plugged it in to a mirror port.

It is easy to enable the ethernet port and disable wifi.  All packets to / from apps now pass through the ethernet mirrored port and can be captured by wireshark.

When I first tried to use the Pure, Denon and Heos apps they failed with error messages saying that wifi is required for using the app.  This was worrying but I found that if I enabled wifi the traffic actually uses the ethernet port (as it is faster, "lower path cost" in routing terms) and I could see the necessary commands.

The packet shown above is actually the key to solving the problem which has been irritating me for the last few years.  I knew that multi-room audio works with a bluetooth input.  The packet above shows that I have to add Jongo devices to a Bluetooth group  for multi-room to work.  I can easily add this into a python script and control this from a web page.

I have been trying to get multi-room audio to work for about four years using Jongos.  This is a quite a moment for me. 

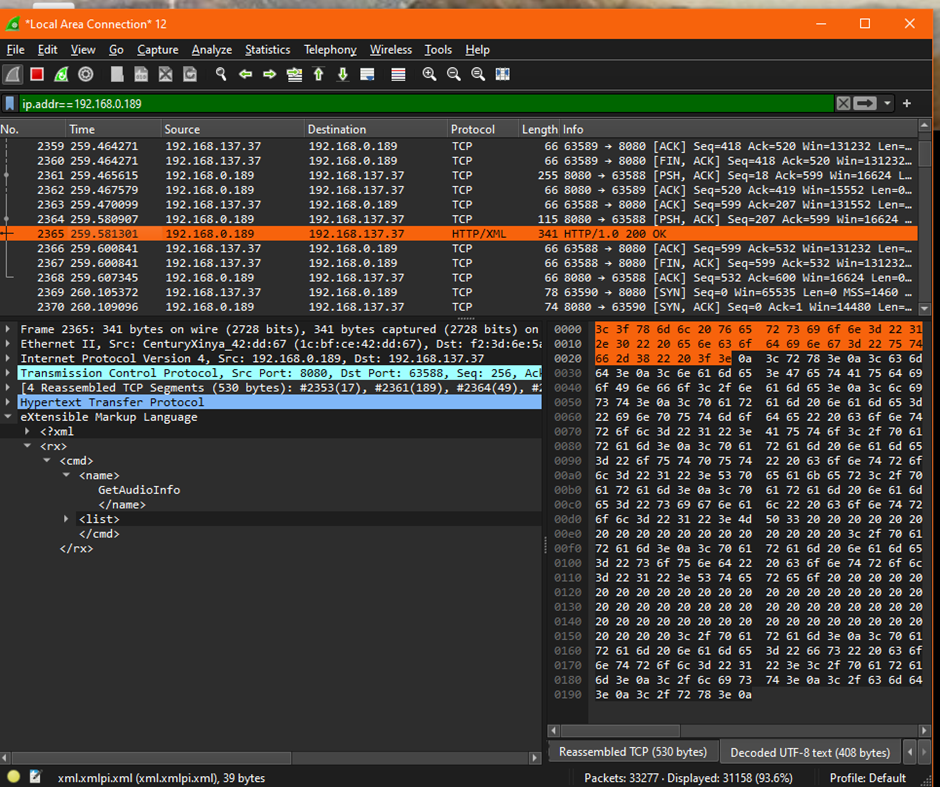
Plan E : Windows wifi hotspot

It is often the case that when writing up a topic you get a new idea which changes the whole picture.  As I was writing this blog I thought that using the PC as a wifi hotspot seemed a bit similar to plan B, proxy server options so I decided to try it out.  Fifteen minutes later I found that it works 😀.  I can easily setup my PC wireless card as a hotspot.  When I do this, the PC has  starts a network TotalFree and has an extra IP address 192.168.137.1 which will forward any packets it receives.


I configure my iPad to attach to TotalFree and it gets an IP address 192.168.137.37.

Now I can start wireshark using LAN connection *12 and it captures all traffic on TotalFree.
As a quick test I setup a display filter for the Denon Amp (on its usual wifi address 192.168.0.89) and I could look at HTTP/XML control packets as shown below.

This is an amazing simple solution which doesn't require any hub or ethernet cables and can be setup in a couple of minutes.
The solution doesn't actually work, as is, for Jongos since they need to be on the same wifi network.  I would have to attach the Jongos to TotalFree.


Conclusion

These investigations have been a great help in allowing me to control my music devices from a python script / web page.  In the past I have tried to solve technical problems using trial and error, being able to see communication in action makes it so much easier to understand what is happening.  

The use of a mirror port and iPad ethernet cable remove much difficulty from monitoring a range of devices in wireshark.  It is still necessary to understand which IP addresses to capture and the protocol in use but we are able to monitor a much wider variety of traffic than previously.


Tuesday 23 April 2024

Wireshark network analysis : 1 : Chrome website access

I have previously used Telerik Fiddler Everywhere to capture / analyse traffic between my iPad and Denon amplifier.  It does an excellent job but is quite expensive to use regularly and a bit difficult to configure for occasional use.  Wireshark is the best-known network analysis software and I wanted to familiarise myself further with its use.

Wireshark runs on Windows and can only analyse traffic through the ethernet or wifi interfaces, that is to say traffic to or from the PC.  As a first example I decided to look at traffic to/from a Chrome session.


First Attempt : BBC

I picked www.bbc.co.uk as a frequently used web-site without advertisements.
To identify BBC related packets in wireshark I need its ip address, which can be obtained using the nslookup command.   Unfortunately the BBC web-site has a complicated front-end which is to be expected with a heavily used, high volume site and there are a number of possible IP addresses.


If I type www.bbc.co.uk into Chrome I am redirected to a signon screen.


Looking at wireshark I can see that a number of IP addresses are involved in the hand-shaking/retrieval of this first page.

Packet 3507 shows a DNS request to 8.8.8.8 (the Google DNS server).
Packet 3512 shows a request to www.bbc.co.uk port 80 (http) at 212.58.236.1
Packets 3513-3515 seem to show requests to port 443 (https).
Packets starting at time 19.769s (3507) through 19.86s (3544) appear to be part of this initial dialog.
It is much to complex for us to understand the way that the bbc is setup so I abandoned it.

Second Attempt : example.com


I decided to use example.com, which is a simple  and useful training / testing site for web development.  It has a single IP address.


Typing in the URL https://example.com still gives us quite a lot of packets.  Unfortunately the Protocol is TLSv1.3, so the packets are encrypted and it is not possible to work out what they contain. 


If I use the URL http://example.com traffic is not encrypted and I can look at the contents of http protocol packets.  This gives me the details of information being exchanged between Chrome and example.com.

As all internet pages need to use https, this approach isn't going to be very useful to me, but it is instructive to see some live internet traffic.

Third Attempt : local web page


I setup a simple web page test.html on my local raspberry pi web server so that I can get a more detailed view of traffic.  I use wireshark to capture http packets from the web server


This gives me a dialog I can understand.  Starting at packet 1736 Freedom contacts PI40 on port 80 (http). After receiving an acknowledgement Chrome does a GET request for the web page (packet 1740).  The response in packet 1742 comprises HTTP headers and the page.
We can see the raw data on the right of the page and the formatted equivalent on the left.


Conclusion


It is very useful to familiarise myself with Wireshark using simple examples.  It has also demonstrated to me that it isn't going to be possible to use wireshark to look at "commercial" traffic owing to the complexity of network environments and the univeral use of encrypted HTTPS traffic.  Decryption of HTTPS traffic may be possible using Fiddler Everywhere or by gaining some in-depth understanding of decryption.  However, for my purposes I need to restrict myself to local traffic without encryption.

Monday 22 April 2024

Samsung phone upgrade

 Traditionally my phones are "cast offs".  When Annette buys her new phone she passes the old one on ("down"?) to me.  My requirements and expectations from a phone are limited and any model from the past few years will suit me.  I don't actually move over to a new "cast off" as soon as it arrives, I wait until the old phone fails or irritates me.

I have been using a Samsung S7 Edge since September 2021 and after repeated droppings screen cracks are becoming larger.  However, the reason I needed to "upgrade" is because the phone is too old for an app I wanted to install.  The next available "cast off" is a Samsung S9+ which runs the software fine.  


Android software

Wikipedia provides release and support dates.

The S7 runs Android 8.0 which was released in August 2017 and last updated in January 2021.
The S9+ runs Android 10.0 which was released in September 2019 and last updated in February 2023.  
The diagram above shows that Android OS is only supported for 3.5 years and Android 10 is now out of support.  You cant upgrade the phone Android version unless you jailbreak the phone.

So both the S7 and S9+ phones have been running unsupported software for a while.  A significant proportion of people use older phones with unsupported software and it doesn't seem to be a major issue.
For example using mobile banking apps and mobile "wallets" is commonplace and they are not restricted to supported / patched devices so the risk must be small.  Advice appears to be that you should only install software from play store and take care with the sites you visit.
My approach will be to continue to use software whilst apps are available and the phone continues to work.

Upgrade Process

It can be quite a traumatic process moving to a new phone and it is pleasing to see that Samsung have made the process as easy as possible.

Step 1.  I backed up the old phone and transferred SIM and SD cards to the new phone.

Step 2.  Start the Smart Switch app on both devices which will transfer all data from one to the other.

Step 3.  Smart Switch told me I had to backup Whatsapp messages separately (as they are encrypted).

Step 4. I then completed the Smart Switch OS transfer, setup a PIN / fingerprint and signed on.

Step 5.  All the installed apps were copied across (it took about 20 minutes).

Step 6.  At this stage all the apps and icons appeared to be available and I could use the internet.

Step 7. I restored whatsapp separately.

Step 8. For security reasons you need to re-register lastpass, bank, credit card apps and re-add wallet.

Conclusion

I was impressed by how painless the upgrade process was.  Of course, it needs to work otherwise people would not upgrade their devices every couple of years.

I was now able to install the new app, which ironically is needed to communicate with our new car, an electric mini.  The app is needed so you can check whether the cars battery is charging, warm the car up before you get in and other indispensible present day necessities.


What else I did with an old iPad : Hifi remote control

Rationale

I chose to setup my 2012 iPad mini 1st generation as a dedicated Hifi remote control.  The hifi comprises a main  Denon amplifier/tuner togther with some Pure Jongo and Sonos options.
Although Denon, Pure and Sonos all provide iPad apps, none of them are compatible with the iPad mini1.  This is not a serious problem as the apps don't make it quick or easy to select and play albums so I have developed my own web app which allows me to control Denon and the others pretty much exactly as I want.

I can, of course use a PC, Android or iPad with the web app; this was one reason to develop it in the first place.  However I found that other people are unlikely to bother going to a URL on their devices to choose music.  Everyone finds it much easier just to pick up the iPad mini which is always setup for music playing.

Ease-of-use

I bought an iPad mini cover which allows us to turn the iPad on/off by opening/closing the cover and bypasses the lock screen, making the remote control effectively always on - like a remote should be.


I can also set guided access so that the web app is always displayed and avoid the possibility of exiting the browser or changing the page. 

Old software considerations

As my browser is restricted to Safari v9, which comes with iOS9, there are a few html and javascript commands which cannot be used as they weren't implemented by Apple until later versions.
Typically, when developing the web app I found it worked on PC (Chrome) or iPad (Safari 16) but not the iPad mini so I had to find an alternative solution which wasn't a difficult task.

When choosing an artist / album to play I highlight the item by changing its class from "songlist" to "active".  JS now includes a replace() method to change a class associated with an element.  However on SafariV9 you must use remove() and add() methods instead.

My track list folders often include album art .jpg files which are displayed as tracks unless I omit them.  There is now a include() method to determine whether a substring exists within a string.  However, for Safari9 I need to use the indexOf() method instead which isn't so neat.

Conclusion

I do have a tendency to be more interested in the technicalities of a solution rather than usability.  The two old iPad projects are both simple, but tend to be used more than other, cleverer ideas.


Thursday 11 April 2024

What I did with an old iPad : dedicated photo album

Three months ago I wrote about possible uses for two old 2012 ipads.  In my opinion the iPad hardware is "as good as new"; they have high resolution screens, wifi/internet access, good battery life, and dont feel slow to use.  Unfortunately the last system software update was iOS9 and there are very few app store programs which can be installed on the OS. 

I have found real, practical tasks for them which will provide a few extra years of use.  The first of these is as a dedicated photo album, setup specifically for an elderly (late 80s) relative with memory issues.  The key requirement is to make both hardware and software aspects of "the album" simple and foolproof.  In addition, a dedicated device is always available and doesn't need to be started / configured / tweaked each time it is used.

I used a TechRadar article as a guide for this setup.  There is actually a slideshow app liveframe which is intended to work on old/obsolete iPads and can still be installed.  Also iOS9 contains the Apple photo app which continues to work well.  I found the Apple app slightly easier to use in a simple manner so I choose to use this for my album.

Using photo or liveframe, a set of photos can be collected into an album and played in a slideshow.  For my purposes, since wifi is available where the iPad is to be used, I set the album up in iCloud.  The user has dementia and finds a single set of family phots interesting and entertaining.  There is no need for him to watch different albums.  It is straightforward to add extra photos to the album using iCloud if required.

Initally the photo album stopped working due to buttons / controls being pressed accidently whilst holding the iPad.  For example touching the screen could cause a confusing screen message or pressing the home button would exit from the app.
I used the Apple Guided Access accessibility feature which disables iPad buttons and prevents the user accessing selected parts of the screen.  As you can see on the screen shot below, the areas of the screen allowing the user to exit, cast or change options (which they may press by mistake) are greyed out which means they are disabled.


One of the buttons which it is useful to disable in Guided Access is Power.  It is easy to accidentally touch the button and turn off the iPad.  You then have to click the button to turn it on, swipe to open the home screen and start the app once more.
An elegant solution is to disable power button use in Guided Access and to use a genuine Apple magnetic cover, setup so that opening / closing the cover turns the iPad on/off.  This prevents the lock screen showing and keeps the photo app active as soon as the screen is opened.
Guided Access is configured so that no buttons are accessible and only the area of the screen allowing swipe left or right is available.

With these arrangement in place the iPad photo album becomes a simple and enjoyable pastime for an older person.  It doesn't need ot be setup each time is is use and the user only needs to know how to open the cover and swipe to change the current photo.  I am very pleased with how much enjoyment it brings.