Monday 20 November 2023

Denon webpage - xml

Intro

Using a github python package from ol-iver I have been able to implement the main amplifier-related Denon functions I want on a web page.


Unfortunately I want more!

It must be possible to obtain from Denon, all the information which is available in the Denon iPad/Android app.   In particular, the app shows a list of all radio station presets from which you can select.  In the protocol specification I did find a telnet command to change preset but there isn't a command to list all presets.

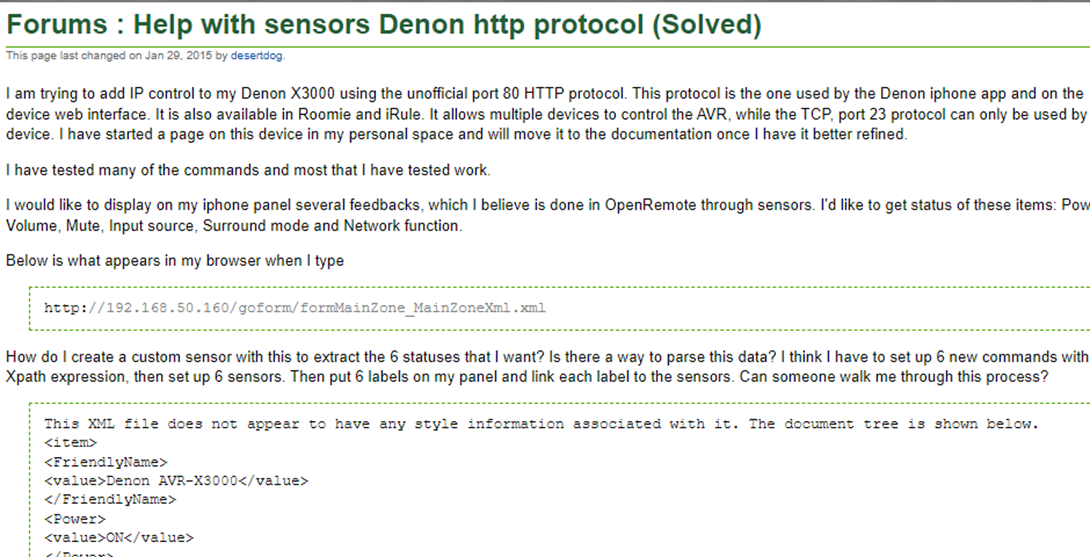
There is a mention in ol-ivers github page of how he used  wireshark to identify XML commands which retrieve information from his Denon AVR.  I took this as a hint that I must use Network packet capture to discover further commands which we can use.  There was also a reference in a Home Assistant Denon forum to the "unofficial port 80 HTTP protocol" which may provide XML using an http request. 


Packet Capture

If I start up wireshark and monitor all packets coming to / from Denon I see nothing useful.  Both the iPad and Denon are on the wifi network and wireshark is running on the PC with an ethernet card or wifi.  Windows isn't very good at putting network cards into monitor / promiscuous mode so I wasn't sure it was capable of doing the capture I want.

Previously I have had better success with a packet analyser called Fiddler.  In particular, it is possible to set up Fiddler on the PC as a proxy server and then configure the iPad to send all its packets via Fiddler.
My copy of Fiddler hasn't been used for a few years and doesn't seem to work.  "Fiddler Everywhere" is a new version of their software which is available for a 10-day free trial, it can also capture https traffic.
I installed Fiddler Everywhere and found it is quite easy to use and works very well.  In fact I will subscribe for a couple of months ($12pcm) as I think it is worthwhile.

Fiddler shows exactly what I want to see, a lot of http requests/responses to/from Denon together with the appropriate message headers and bodies.  The message body is in XML format.  

Packet Analysis

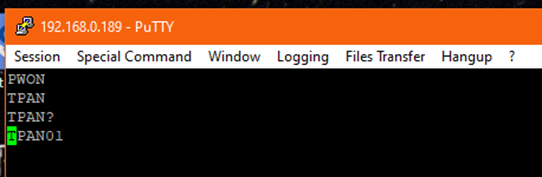
Most of the packets are in POST format but a few are GET requests.  The good thing about GET requests is that you can enter them directly into the browser.  I tried submitting a sample request and Denon responded with an answer written in XML 😀😀

POST requests typically need to be sent using a browser HTML form, but I use an excellent little utility, postman which submits requests and receives responses.  Now I can submit a POST request and receive a response.

Looking through the (hundreds of) requests I saw that most of them are covered by ol-iver's functions.  The POST request which I really want is "GetTunerStatus" which I will describe further below.

Some of the GET requests are interesting.  As shown on the screen shot below, commands within the Denon Protocol specification can be submitted as  a GET request, which is potentially much simpler than ol-ivers telnet interface.  Packet 1449 shows a HTTP GET request to change the radio station preset to number 6.

I can easily add some buttons on the webpage to change the preset value:


Packet 1238 shows a POST request to list all presets and the xml response which is provided

Web page

When I tried any POST requests in my web page I received messages to say that they were blocked owing to CORS (Cross Origin Resource Sharing) security weakness.
If I wanted to I could circumvent this issue by starting chrome on windows with a switch to allow CORS, but I felt this wasnt the way to go and I abandoned the idea.

Instead I returned to python, found a geeksforgeeks explanation for submitting HTTP POST requests and tested whether this would resolve the problem.  Success 😀😀, Python responds with a chunk of XML containing the information I need.
Initially I imported XML to JSON (xmltodict) to make the data accessible but I ended up just searching on the <name> tag to extract the current radio station.

CGI

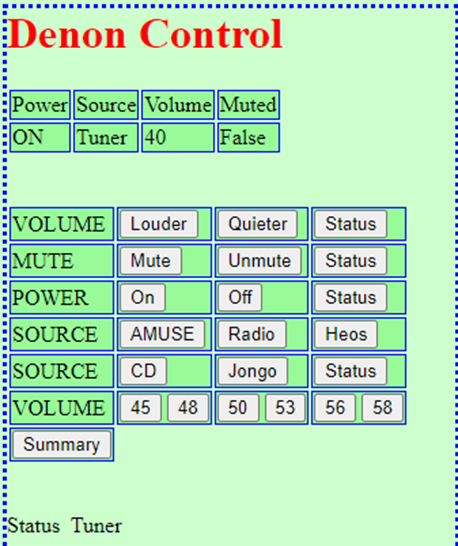
Rather than submitting web requests using the websocket interface I felt it would be more sensible to use the lighttpd web server python CGI interface.  My python script needed some tweaking to work in CGI (xmltodict didn't work) but I was soon able to report the tuner preset back to the web page.  This was inserted in my draft web page into an iframe.  An early draft is shown below (before formatting).

Result

We now have a properly functional single, simple web page which has all my Denon controls easily accessible and controllable. 


Denon webpage - using python


Aim

I am very happy with my recent purchase of a Denon Receiver to replace my old Sony amplifier which was creaking with age.  The sound quality is great and it will play music from my own collection, radio and CD.  I am used to choosing music to play from my AMUSE (A MUSic SErver) web page which controls an RPI music player (MPD) and I can continue to do this.

In addition to a traditional IR remote, Denon provide an iPad/phone app which allows me to remotely control the power, volume, sound source and radio station.  The app isn't brilliant but does the job.
There is also a simple web interface which can be used to configure Denon, but doesn't allow control of the various functions.

I would prefer to have my own web page to control Denon functions (e.g. power, volume, sound source, radio station).  This should work in parallel with the AMUSE web page, and it may even be possible to combine them.  It is slightly simpler to load a web page than an app and I put all the operations I need on the same page making it quicker and more convenient to use.

Research

Github is the easiest place to find suitable projects / programs on which to base my own solution.  I found about twenty hits for Denon; node.js and python programs are of interest but I ignore others using languages with which I am unfamiliar, Go, Typescript et al.

A python solution "denonavr" by ol-iver  looks to be well-used and popular.  It is a command line tool but I can incorporate python CLI using my websocket interface as I do for other programs.
Denonavr uses a python package asyncio for asynchronous communication.  You submit a request, and when the response is received a function is invoked to process it.
Denonavr appeared to have a comprehensive set of commands to control the amplifier power, volume, source etc although there isn't anything to change readio stations - presumably because the author has an amplifier without a built-in tuner.

Denon.py

I installed the denonavr package in a python virtual environment and ran commands interactively to see if it worked.  Following the excellent documentation provided by ol-iver I was quickly able to make first contact with Denon.


The example above shows connection to Denon using its ip address 192.168.0.189 followed by a request which lists the sound sources which Denon can provide.  These commands are "synchronous", so each communication to Denon waits for a response.
Asynchronous communication is preferred and in future will be the only access supported.  Its advantage is that resources aren't tied up waiting for a response from the server.  A sample async interactive session is shown below.

Having satisfied myself that the package was useful I could write a skeleton script, using the argparse package to specify permitted commands.

It is then a straightforward task to use denonavr functions to implement my own commands.

Radio Stations

I already knew that ol-iver didn't implement radio station functions.  Looking through the Denon Protocol specification I could see a very small number of Telnet commands which could be useful for changing the radio channel.

Although ol-iver uses the telnet protocol for his package it wasn't obvious to me if / how you could adapt it for these extra commands.  I checked with a Putty telnet session and the commands seem to work fine. The "TPAN?" command returns the number of the current radio station.  TPAN01 would change the station to channel 1.


I looked for a generic python telnet package I could use to put these commands into a program.  The current python library is telnetlib3 and I found an excellent geeks for geeks tutorial to try it out.  The sample script enables me to execute a "PW?" command to establish that Denon is turned off.  I could then turn the amp on with a "PWON" command.
This gives me a generic telnet capability to add commands that I need.

Sample Webpage

Based on previous projects I can simply code my python commands into a web socket request.  The command is then executed on the server and output is returned to the webpage:

The picture below shows my draft Denon Webpage:

Buttons to control Denon are grouped in a table for convenience and at the top a table shows current Denon status. This information is available when Denon is "turned off" and of course you can issue a command to turn the device on.

Conclusion

We have made an excellent start in setting up a Denon web page.  It is easy to use and has all the functions shown on a single page.  I have started to use it on iPad, PC and phone to choose what I listen to.  Some investigation is required to add Radio Stations, which I will look at next.

Thursday 9 November 2023

6502 : BEN2 : MON5 cutover


Scope

The MON5 update contains no new functionality.  It comprises some hardware changes which seemed very straightforward but have required some hard work.

  • Add an LED indicator on the shift register display when interrupts are enabled.
  • Update the "write-byte" option to use PB1, PB0 to control ROM write enable.
  • Update the write-romx monitor download/upgrade program to use PB1, PB0
  • Update music program to use PB2 instead of PA1
  • Move breadboard components for shift registers/LEDs and sound to soldered AMI board.
  • Amend individual bits in VIA registers rather than overwriting complete contents

Change pins used for write-byte menu option

One minor change in MON4 was converting HD44780 LCD to 4-wire control, which freed up 4 VIA pins PB0-PB3.  Within MON4 I was aware that it was dangerous to share PA4 and PA3 between LED display and ROM-write functions.  My work-around was to only connect PA4,3 when required to update ROM code.
With the extra pins now available I decided to use PB1,0 instead of PA4,3 to control ROM writing.  PB1,0 will not be used for other functions which makes it safe to leave wires connected all the time.  Previously PA4, PA3 attached LEDs provided handy indicators to show write-ROM operations so I also need to set up an LEDbar LED to indicate that ROM is being written. 

Previously when writing to VIA CONFIGA/B and PORTA/B registers I have simply written an 8-bit value over-writing existing contents.  It is preferable to only update the specific register bits required for a specific operation, to avoid unwanted side effects.  The registers can be read as well as written and individual bits can be updated using appropriate AND, OR, EOR operations before writing back the updated values.

For extra security I decided to leave PB1, PB0 as inputs unless a write-ROM operation is in progress, this helps prevents accidently writing values to those pins.
Now that PA4 and PA3 are not connected to write-ROM pins (ROM/WE and ROM/OE) it is actually safe to leave the code which updates them in place.  I do this so that we can actually load code by reconnecting those wires if necessary and we have an extra visual indication that write-ROM is taking place.

The menu option " write ROM" requires code to be copied from ROM to RAM, then executed in RAM whilst the ROM is unavailable (for reading instruction) during the writing process.  For the copying process to work, there must be no absolute addresses in the "RAM code", which means there must be no subroutine calls.  I had a clever idea that I could incorporate a subroutine, providing it was copied to RAM with the other code. It was a bad decision.

Change write-romx download program

Back in July as part of MON2 I developed a program write-romx which uses xmodem to download a program to RAM and then copies it to ROM.  It was an excellent innovation and allowed me to finally detach the Arduino Mega "umbilical cord" I was previously using.
It works fine and hasn't needed updating since then.  I now need a new version to use PB1, PB0.  Although it is a standalone program some of the system subroutines it uses, together with the shared memory map have been updated since it was written, and I should carry out a general update.

Unfortunately I underestimated the pitfalls of this task and rushed into a quick implementation.  Sadly, when the new version I was testing went wrong it over-wrote crucial parts of the ROM and made BEN2 unusable.😢
I had a backup ROM chip with the MON2 image loaded so I was able to update a copy of the MON2 ROM to MON3 and then to MON4.  After wasting a couple of days I was back on track.
I then proceeded very carefully to make changes to write-romx, testing each small change I made.  I found that the local subroutines with the RAM copy program were a very bad idea - I overlooked some detail (perhaps with the JSR mechanism) which stops them working.
Somewhat chastened and a little bit wiser, and at a slow but steady pace, I successfully updated write-romx.

Board Update

By the time MON4 was complete I had a breadboard hanging off the computer containing a shift register and LED together with a speaker connection.
When I created the AMI daughter board, there was some unused space and it was always my intention to add new hardware to AMI when appropriate.
Despite putting a lot of effort into making it easy to detach the board I was nervous about doing so.  At worst failure would mean BEN2 could never be resurrected.
I carefully noted connections as I removed them from AMI, until AMI could be dismounted from its stand was available for me to solder.
My soldering is improving and I was very careful to position the connections carefully as I worked.  On completion I checked the board for shorts between adjacent tracks and continuity tested all the connections.
Reconnecting AMI I was very pleased to see that BEN2 was still working and, after some minor tweaks the new shift-register/LED-bar and sound were working as well.
I dont know whether this is the final version of the BEN2 hardware but it must be close.

Documentation Update

A major part of the cutover work was bringing the schematic and board layouts up to date.  One would normally expect to update these before doing the work, but as the changes developed gradually I could add them in easily enough.  I will add the latest diagrams to this blog - I almost think they are artistic.