Labels

Sunday, 22 May 2022

HA: MQTT + Node Red


Message Queue Telemetry Transport is a lightweight publish / subscribe message transport.  For example Sensor hardware publishes values which the MQTT Broker passes on to all subscribers.
Alternatively a client can publish an instruction (topic) which wll be passed on by the MQTT Broker to all subscribers for action.
There are lots of MQTT resources/tutorials, for example at mqtt.org

Home Assistant has an integration for an MQTT Broker which can be utilised with a wide variety of devices. Typically, for me, the client will be an ESP8266 or ESP32.  For testing I use a NodeMCU ESP8266 and the Arduino IDE.

HA has an integration for the Mosquitto MQTT Broker which is widely used and very easy to install on HA. I used a good video by EverythingSmartHome. Once the install has completed the broker provides you with a screen where you can experiment, sending packets and listening to Topics.  This will be very useful going forward to watch messages flowing through the system.

I followed a good tutorial from emqx.com to setup a NodeMCU ESP8266 as an MQTT client.  It uses the ESP8266WiFi library and PubSubClient which is allows messages to be published / received.

Our inital sketch simply sets up wifi, sets up MQTT client and publishes a "hello" message which is promptly displayed on the Broker Topic Monitor.
The sketch is very straightforward so I have included it below.  
We dont have sensors attached on functions to carry out yet but you can see how easy they will be to add.


Node Red is a HA add-on / integration which allows you to configure how devices interact using flow diagrams.  I set up a simple test using my ESP8266 keypad and MQTT.  With the help of the Hook Up Guy I was quickly able to use Node Red to instruct HA to say a phrase when button 7 or 8 are pressed.  This isn't a trivial exercise and it is impressive that Node Red plus the wizardry linking it to HA makes it so easy.


HA : Practical Music Solution

 I can probably spend months tinkering with Home Assistant and Google Assistant without having something practical.  I need to remember that the solution needs to help me in practice rather than include clever esoteric features which I wont use.

Home Assistant

I settled on two HA dashboard screens, the first is for MPD playlists and the second for radio/music  streams.

My existing, excellent, solution for music is an RPI running MPD with an extensive music database.  In most cases I will use a webpage to choose music so I include this webpage on my dashboard.

Any specific selections I want to have under voice control are set up with an input select card.  Initially I set this up for three albums and a charts playlist but I can easily add more options if they prove useful.  Only these four music selections are available using voice control, but that is ok.  I do have voice control for general purpose changes such as volume up/down, next track, play, pause, shuffle on/off. 


My second screen is for Pure Jongo Job control.  Typically I use this for playing radio stations so I set it up for common stations I listen to together with a few music streams which I may expand later.  Jongos dont have so many control options but pause / resume will be important.

Both the MPD and Jongo options run through my Sony amplifier so I have options to switch between the two music sources and amplifier volume up/down.


Google Assistant

The Home Assistant configuration has given us various capabilities to control music using Linux Music Player and Pure Jongos.  However we had this capability previously and our main objective is to have voice control of sounds.  Home Assistant provides us with an automated IR (infrared) remote control to "press buttons" so the final piece is to add voice control.

Google Assistant controls some devices with voice and Google Home lets us setup routines for "Hey Google" commands which carry out a wider variety of activities.  Activities provided within Google Home are very limited for my devices; I can only turn lights on/off and tell the Nest Mini to say things.  However I can import all scripts from HA to GH and invoke any of them with a voice command.

This provides exactly what we need; as long as we have a HA script for a function we can invoke it using a voice command.  To start off with my Broadlink HA integration allows me to change the volume and switch between MPD and Jongo output and HA can pause / resume devices.
Google Home doesn't allow me to specify parameters / variables so I need to set up a script in HA for each playlist / album / radio station I want to control with voice.  Once these have been imported into Google Assistant I can easily add voice commands.

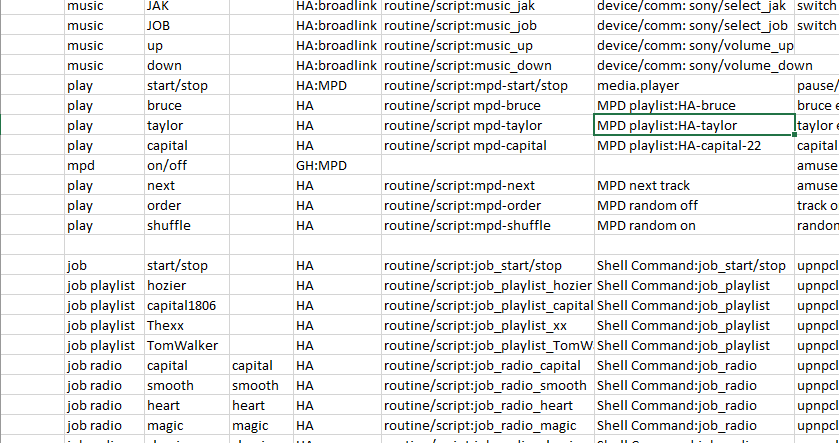
It is easy to get carried away add functions, which I wont use.  For voice control it is even easier to add commands which I don't remember so I cant use.  The sensible way forward is to limit voice control to frequently used functions such as playing radio stations and changing the volume.  I set them up in a spreadsheet so that I can keep track of what is available to me.


I should also mention that Google Assistant provides an alternative to many web browser functions.  I can easily ask it for the weather forecast, information and news, although it is more difficult to phrase requests so that I get something meaningful.
Perhaps the most useful function is "hey google, where is my phone" which causes my phone to ring.


Wednesday, 18 May 2022

HA: Light Bulb Colour Patterns

 IoT devices can usually be controlled from their own app, from Google Home (GH) and Home Assistant (HA), each method has its own features.  I expect the app to have the best level of control, and a subset of that to be available when linked to GH.  HA features are implemented by the community and are typically much better than GH.  For my FCMILA cheapo coloured lightbulb the Tuya / Smart Life app doesn't allow you to do very much.  There is one "scene" called "gorgeous" which displays an pleasing range of colours but it isn't available on GH or HA.  This lead me to investigate the ability to set up HA to display a sequence of colours.

Looking at HA Developer tools/state you can see the current configured parameters for the bulb.  Within Developer Tools/ services you can can configure and test a service to turn the light on with a colour of your choice.


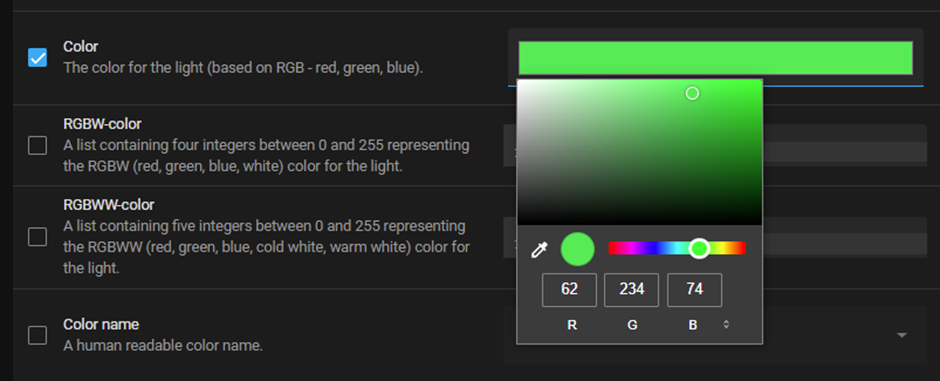
It is now simple to create a script calling this service so that the bulb colour can be changed.  At this stage we want to set up a sequence of colour changes.  It is easier to do this in text mode rather than the user interface.  We simply edit a script which causes a single colour to be displayed and copy/repeat the text for each colour we want.  We change the RGB colour values to  the ones we want and then add a delay action between each section.  We now have a script which displays a sequence of colours, each for 1 second.  Finally we need to add a loop to the script.  Looking at the scripting documentation I setup a "for loop" script in which I can specify how many times the sequence will be displayed.


The completed script can be run from the dashboard or exported to Google Home via Home Assistant cloud so that it can be run with a voice command.


Saturday, 23 April 2022

HA : Playlists on Jongo with Voice Control

 I was pleased when I found that Home Assistant (HA) auto-discovers Jongos and allows you to play music on them.  Unfortunately my enthusiam was dampened when I found that you can only specify a single track to play from Local Media or DLNA server, making it pretty useless.  It is possible to specify / play radio channels using HA which may be of interest in future.  However my desire is to be able to use Jongos for playlists in the same way I use MPD.

Technical solutions

I knew that HA allows you to use linux commands or shell scripts within HA scripts. So I thought there would be a potential solution.  Googling gave me the idea that I could use curl commands to send requests to play music through Jongos.  I investigated and it is indeed possible to contruct SOAP (Simple Object Access Protocol) requests to start music.  The main problem is that Jongos use a variable port for communication which you need to determine using SSDP (Simple Socket Discovery Protocol), so some further work would be required to find port numbers.  In addition SOAP requests are quite tedious to create and would require extra work.


In fact I have done the same work using the python library upnpclient to assist with the creation of requests and control of devices.  My solution uses web sockets from a web page to send requests to a web socket daemon on my application server which then submits requests to Jongos using upnpclient.  My second option was to send these web socket requests from a HA script using curl to my app server.  Unfortunately the web socket protocol is not very similar to http and curl doesn't support it.

HA is written in python so it should be possible to run upnpclient python scripts directly on the HA server.  However the HA python documentation says that you cant use python imports on the server and would perhaps need to use pyscript instead.
This may be the most effective solution eventually but for the moment I prefer to try using commands.

As the HA and application servers both run linux the easiest way to control the app server is using ssh commands, which is the approach I adopted

Remote Login

Normally, in a terminal you can sign in to a remote server and run a command or script using the syntax: ssh user@192.168.0.nnn <command line>.
When you do this the remote system asks for a password and may prompt you to add the server to your known hosts table.  If we are automating our commands within HA, this isn't acceptible.
Storing keys to remove the need for passwords is something I do quite often but since HA uses containers the problem is not quite so straightforward.  I found an excellent article written by HA "Command Central" Mike which addresses and resolves these problems, which are regularly experienced by HA users.

As HA uses containers you shouldn't store keys in the usual file /root/.ssh/id_rsa.  HA software upgrades can erase previous contents of root.  Instead you need to save the keys in a separate area /config/.ssh/id_rsa was used instead and include this location on your ssh command line.

When you use the command line in HA you are actually working in the SSH container, but when your commands are automated they are exectued in the HA OS environment, so to test your commands you need to jump into the appropriate container: docker exec -it homeassistant bash.

Finally, since our id file is not in the usual place we have to specify that the known_hosts file is in the same place otherwise we would have to answer the known_hosts question repeatedly.

Once we have done all this we can test remote command with some confidence.  Here is the first use of a (quite long) ssh command string to run a simple hello.sh "hello world" script.

A working solution

We can now proceed to setup a script to start our music.
First we add a shell_command to our configuration file


Next we add a script automation which calls the shell command : jongo_play.
Thirdly we can add a dashboard card to play the jongo.

Finally we can "expose" the script to Google Home and set up a routine to run the script when I say "Hey, Google, play Job".
It works beautifully, after a few seconds the music plays on Job.

It is still a bit limited, in that the playlist I request is fixed, however it is a very satisfying PoC and I can add as many scripts/voice commands as I want.

HA supports webpages in a dashboard so I added the amuse and jongopanel webpages allowing me to control both MPD and Jongo players like I usually do.


Monday, 11 April 2022

Home Automation : Google Assistant Voice Control

The story so far

We started the Home Automation with a Google Nest Mini and we were able to set it up for voice control of "compatible devices", Sonoff smart power switches and an RGB colour bulb.  I wanted to expand the home automation setup to include other devices.  In particular I wanted voice control of the music system as I dont want to use Spotify/YouTube premium services.

Home Assistant was chosen as a good platform for extra functionality and I have spent some time finding out its capabilities for devices and setting them up.  The most significant device I have added so far is my Linux MPD server, which is my main way of music.  I have also added Pure Jongo devices which are available in various rooms in the house.  

I also have the ability to control these devices, for testing I used webhooks so that I could setup a browser button to trigger actions. I have also the ability to setup the actions in scripts which can be initiated in various ways to make changes.

The last building block is adding voice control to our solution so we have a "modern" home automation setup - I think tablet controls are very much last years thing.

Home Assistant Cloud

We need to integrate Google Assistant (GA) with Home Assistant (HA) if we are to utilise GAs voice control.  This isn't a trivial matter but the excellent HA documentation describes the steps to set it up.  In particular you need to make the HA server available externally on the internet and provide an SSL certificate.  I have done this before for my web-site but adding a second instance makes it more complicated to setup.  As an alternative the guy who set up Home Assistant has an add-on Home Assistant Cloud (HAC) which provides the external functionality between GH and HA for you.  It costs about £4 which I feel is particularly worthwhile as HA is a significant product provided for free and the guy also provides ESPHome which is something I want to use next.

I followed the documentation to setup HAC.  As usual you need to create an account to use the functionality of HAC and signin within HA.  Then you go across to GH on the iPad enable HA integration.  Once this is done I can see the HA devices within GH.

I can also control them, turning lights on and off etc.

In addition to the devices HA has exposed its scripts and scenes to GA.  Thus in GA I can utilise scripts that I have set up in HA to control the devices that GA doesn't know anything about.  This is exactly what we have been aiming for.

The script mpd1 causes MPD to load one of its playlists and start to play it and I now have access to it within GA.


GA Routines

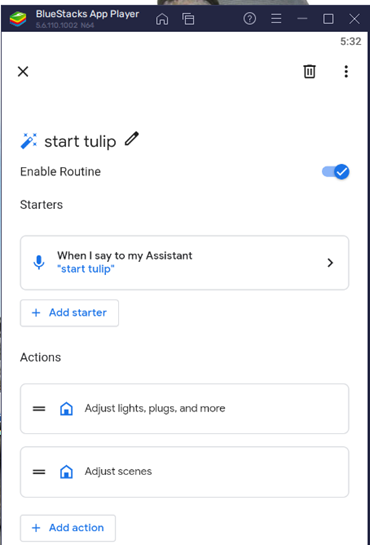
GA automates actions using Routines.  I setup a new Routine in GA which is initiated when I say "start tulip". I can associate actions such as switches and lights with this routine and also Scenes.

I added my mpd1 script/scene as a Tulip action.  Wow, now if I say start Tulip the playlist is loaded and run.

Clearly tulip isn't very mnemonic so I setup playlists in MPD called things like HA-bruce and HA-taylor with suitable track lists.  I then define scripts mpd-bruce and mpd-taylor in HA which load / run the MPD playlists.  I sync these scripts with GA in HA Cloud.  Finally I setup routines "Play Bruce" and "Play Taylor" in Google Home and I can call Bruce (Springsteen) and Taylor (Swift) up whenever I want.

I can use the same technique for any MPD command I want, for example "Play Next" will skip to the next track.


Conclusion

I am very pleased with this result.  I have a flexible generalised solution to my objective.  Within Home Assistant I can define actions on various devices, which aren't available to Google Home. I can then define voice commands in Google Home to carry out these actions.  

This was a proof-of-concept.  I have only scratched the surface of what is possible, but I this has been a very successful experiment.


Home Automation : Making things change

In the previous blog we set up a number of devices which we want to control within Home Assistant (HA).  The HA dashboard is available on tablet, phone or PC browser session and we can control devices there but we would prefer other/better ways of starting them.

HA  allows you to configure automations which define a trigger, conditions and an action.  The trigger could be a time or someone entering a room and conditions, for example a time range, must be satisfied before the action, such as turning on a light, is initiated.  For our first automations we choose "webhook" as a trigger.  A Webhook is initiated by a POST request from a browser anywhere on the network.  Typically the user clicks on a URL which posts a form to the HA server which causes the associated automation to be triggered.

Turn on Nest Mini Speaker

In this example we specify a webhook trigger and HA provides us with a URL for the trigger.


To determine the name of the entity we want we go into Developer Tools and, looking down the list of available entities we see there is a media_player.office_speaker
Looking at the Developer Tools services we can see what services are available for a Media Player.  In this instance, we clearly want Media_player.Turn on.

We can return to our Automation and specify we want to call a service called Media_Plaer: Turn on.

This completes the automation which we can now save.  If we click on "Run actions" in the Automations list we can check that the automation does what we want it to.


Now that our automation is working we can setup the webhook.  We can test it from the linux command line before finally setting it up as a POST form in a web page and testing it.


Load an MPD Playlist

Once we have done one automation it becomes easier to set up more.  One action I want to do is to start a playlist on the MPD entity.   The service which does this is MediaPlayer: Select Source.  You also have to specify a valid playlist as shown below.


I set this up as a script, when this script is run the associated playlist is loaded into MPD and starts playing.

We now have the ability to trigger automations from outside HA and they are verging on being useful.


Home Assistant: adding devices

The story so far is that I have installed Home Assistant (HA) successfully on an RPI4 and I can access the Home Assistant console through a browser session which allows me to configure functions and look at the current status.

HA has helped me by auto-discovering a number of "integrations", which are devices and systems it can interact with.  I have been able to instruct HA to show me the status of my VirginMedia SmartHub on the dashboard.  Google Home (GH) / Assistant have already given me the ability to control a SmartSwitch, RGB colour bulb and Nest Mini Speaker with voice control, so HA has a hard act to follow.

GH is limited in the number of devices it can deal with and the range of functions.  Typically if something is GH enabled and quite new it can be setup easily, otherwise there is nothing you can do.  I would particularly like to be able to play some of my own music, and GH won't play specific tracks or albums without a subscription to premium version of Spotify, YouTube etc.  I am hoping to be able to combine the voice activation functions of GH into HA so that I have the convenience of GH and the extra capabilities of HA combined.

Playing Music

HA was kind enough to discover my DLNA server which runs on a Raspberry Pi.  I mainly use it for watching videos on the TV but it also has access to my shared music.  Clicking on the server card on the integrations page causes it to be configured automatically and added to the default dashboard.  Clicking on the dashboard card allows me to navigate through the music directories and choose a music track (just the one) to play.


 By default, it plays in the browser but I can direct it to play on the Nest Mini speaker instead 😊.   In fact the Google Cast integration which was setup automatically contains the  Nest Mini as the "Office Speaker" entity for me to use.  


Choosing the Office Speaker card on the dashboard also allows me to select music to play.  In addition to the DLNA server I can choose local media, radio browser and Google TTS (text to speech).  Local media simply chooses music from the PC/iPad/phone I am using for HA access.  The radio browser integration provides a load of radio channels from around the world including a comprehensive selection of UK stations.


TTS is quite fun, just type a sentence and it is read out for you - good news I can configure for a British accent.  This may come in very useful as I can send the text to any speaker device.  

I was very pleased that my Pure Jongo JOG and JOB (T4 and A2) speakers show up as DLNA renderers in the integrations list.  This means I can send music, radio or messages to any or all of them.

We are doing very well discovering useful HA facilities, I can now choose music/sounds from a variety of sources and play on a number of different speakers.  These don't yet provide a useful solution but they are essential building blocks.


Adding Switches and Lights and music player

Although the music devices are interesting, I want something I can control automatically using HA.  I have four eWelink sonoff smart switches which I purchased for home automation some time ago and I would like to be able to turn them on and off.  Googling HA + sonoff gives me a guide to configuring sonoff 

The first step is to choose add-on configuration.  I needed to add the eWelink repository and I can then install the eWelink Smart Home app and add eWelink to the HA sidebar.  In the add-on information page for eWelink I can open the web UI and sign on to my eWelink account.

For a technical reason, relating to the APIs used I have to set up a scene containing the devices and add some information to the system config, configuration.yaml.  After restarting HA a new card called "flasher" (from my eWelink definition) which turns the switch and attached LED strip on or off.

I now wanted to add my RGB light.  The appropriate integration is from a company called Tuya.  I already have the Tuya SmartLife app to control my RGB colour bulb but I also needed to register with the Tuya IoT platform to facilitate HA integration and obtain an authorisation key.  Finally I can add the integration and I have a new card on my dashboard to control the light.


The third new integration I want to add is MPD, I am hoping this can provide the starting point for music integration.  Installation consists only of adding a couple of lines, including the MPD server IP,  to the configuration.yaml file. Using a new MPD card on the dashboard I can now start and stop music on my MPD player.  This is excellent.


HA now knows about the devices I want to control and I am ready to move on to the next stage, controlling them. 

Thursday, 7 April 2022

Home Automation

 In my initial investigation with the Google Nest Mini I was able to control RGB lightbulb, smart switches and, to some extent the TV.
I want to expand the scope to more devices and also make the control somewhat more sophisticated.  Intelligent controls form the basis of Home Automation which builds on top of basic device control.  An initial look at the field gives us IFTTT and Home Assistant as interesting possibilities.

IFTTT

IFTTT stands for If This Then That.  Automation is based on actions (THAT) which are triggered by an event (THIS).   For example:  whenever you publish a new blogger post you could alert your twitter followers.

For my demo I chose an IFTTT button widget as my trigger (THIS) and creation of an item in my Google Task list "Jobs" when the button is pressed.  Once I enabled the widget I could use a button on my iPad to add an item to the joblist.  In practice it isn't much use, but it gave me an idea of what to do.

Unfortunately, after that I didn't make much progress.   IFTTT could not control either of the devices I already have working: Smart Life (RGB Bulb) actions aren't supported and ewelink (for wifi switches) requires a $10 pa subscription to enable control.  As these devices already work on Google Home I felt it didn't offer me anything extra.

Home Assistant

Home Assistant (HA) looked promising but it is difficult to tell until you try it.  It was suggested by Clemens Valens at Elektor because it supports ESPHome, a Home Automation offering for ESP8266/ESP32,  It apparently supports Google Assistant and probably sonoff.

HA  recommend installation on a dedicated RPI4, which implies it is a serious meaty product.  They provide a suitable, up to date 64-bit image, which is pre-configured for everything you need.  When you burn your image to SD card and start up your server you can access the home page through a browser at http://homeassistant.local:8123.  Wonderfully easy.

HA does its best to help you by discovering local network devices it can work with automatically.  


After the excitement of installation I struggled somewhat to use HA.  There is a dashboard showing all the things you can do, initially it just showed me what the weather is and what my name is :(.  I found a couple of good youtube videos from JuanMTech and TheHookup to give me ideas on what to configure but nothing specific I could use.

I need to get something more interesting, ideally something useful, for example the ability to control the devices I have.
I was pleased to find that the Arris TG2492 router which was auto-discovered is my Virgin Media Superhub.  Clicking 'Configure' on the entry causes HA to go off to configure it in to the system and adds the results to the dashboard.  There are a number of router statistics that you can look at, for example the network traffic over the past couple of days:

This is good, I am happy my new HA server can actually do something real.  I still feel a million miles from being able to conntrol it but I have made a start, the community who put it together have done a grand job making it useable and it has some excellent documentation.  I will add more in my next HA post.


Saturday, 2 April 2022

WSL2 and Windows Terminal

 There are some good reasons for using Windows Subsystem for Linux (WSL) version 2 over WSL version 1.  Unfortunately I cant remember what they are at present.  I do recall some frustration in the past when it wasn't available to me.  Anyway, I spent a short while yesterday setting up WSL 2, which turns out to be very easy .  WSL2 provides a VM with a Linux kernel as opposed to WSL1 which uses an Ubuntu flavour with Windows System Calls, so WSL2 should provide a more "real" linux experience.  I installed a Debian flavour VM to run WSL2 and I was pleased to find out that I can run WSL1 and WSL2 alongside each other as I don't want to redo/convert/check what I have done before.  I had a minor bug to investigate / fix before the Debian distro could be converted to WSL2 but once completed the distro looked fine.

As an afterthought the WSL2 tutorial recommends Windows Terminal - they are quite right; it is is an excellent addition to my environment.  It is open-source software which you can install from the Microsoft Store.  At its simplest it provides a tabbed window which allows you to run a number of Windows Command line and Powershell sessions.  As I have WSL1 and WSL2 configured it automatically provides me with the option to start WSL1 and WSL2 sessions.  Already it sounds good.

Even better you can easily customise its configuration using the settings.json configuration file.  Until now I have used WSL for RPI and RISC-V SSH sessions and Putty for RISC-V console and Arduino serial port sessions.  However, within a few minutes, I was able to customise WT allowing me access to all these systems as tabs in a WT window.  RISC-V console sessions are the easiest, they just use Windows cmdline SSH.  I have set up keys in WSL1 for my Raspberry PIs to for passwordless sign on so I use a WSL+SSH command line to start RPI sessions.  For Serial ports we use minicom running on WSL1 to access COM ports courtesy of a helpful tutorial by Scott Hanselman, and I can use a WT WSL1+minicom command to start the consoles.

This is wonderful, I have all my terminal access in one place, working seamlessly and easily configurable.


Thursday, 31 March 2022

Google Home

I am well behind the curve when it comes to talking to the internet.  Both Harry and Alex use Alexa for various tasks at home but I haven't felt a urge to follow in their footsteps.  Back in December I made an impulse buy of a Google Nest Mini (v1) at the supermarket for a special price of £20.  I finally got around to installing ("playing with"?)  this week and I am rather impressed.  In fact I combined this with two other impulse buys, an RGB controllable bulb (OCT18, £11) and some Sonoff smart power switches (SEP20, 4 x £8).

As expected the Nest Mini is easy to install using Google Home and my wifi network.  It listens carefully to what I say and I can speak in a normal voice, not slowly or shouting.  It has good accuracy understanding what I say, even if there is background music.  It has a switch so I can turn off the microphone if I want.


Straight away I can ask it to play radio stations, which I like as I often change my mind what I want to listen to.  When I ask Nest to play music she tells me I need YouTube premium (or Spotify Premium) to play specific songs but she chooses a playlist of appropriate music instead which she plays (including adverts).  

Next I set up my Fcmila RGB Bulb in the recommended app SmartLife on my phone and linked the app to Google so that I can turn the light on and off and change colours by speaking to Google.  I think it knows quite a few colours - it will be a good game to see how many colours are recognised.


I tried setting up our Samsung TV (QE55Q65T series) in Google Home but it was rather dull, it is about 3 years old and doesn't have full integration with Google / Alexa.  I can change the volume, change source, turn on/off.  Virgin Media integration is even less, they have a trial for integration in 3 UK locations, and you will have to pay for the privilege.
Harry has an Amazon "Firecube" which he can use to control his TV properly but I am not that fussed.

The last connection I tried was with Sonoff S26 smart switches.  I set them up in the recommended app ewelink on my iPad so that I can control them.  I can then give them names, link from ewelink to Google and use Google home to turn them on / off.


Of course I can use Google Home and speak to my phone in the same way as the Nest to achieve the same effects so I am not restricted to a single room.  I expect I will also start asking for internet information to see how easy / helpful it is to find things out verbally.

In conclusion, I must say that I like the Nest Mini.  With a minimal level of frustration I have managed to set up a number of devices and Google is very good at understanding what I want her to do.


Risc-v Debian Linux Build for LicheeRV dock

 I am a long way from being able to build my own linux system.  A lot of the discussion on the techie telegram forum for Nezha/Allwinner RISC-V has centred on the tasks and software required to get to the stage where linux can boot.  A great article by Andreas entitled Building boot software an Debian from sources for a RISC-V board (Sipeed Lichee RV with D1 processor) does exactly what it say it will.  Even better it contains both detailed instructions for every step and a copy of the final build.  The final product is a good working Linux system (apart from an HDMI issue) with a recent kernel which can be used normally and is updatable.

Initially I followed instructions to create an SD card from software binaries / kernel and a rootfs.  It starts up cleanly.

 A lot of informational messages from the various boot stages are displayed which sheds some light on what is being done during the various boot stages.


"The Long Story" is a detailed list of commands used to build the system, clearly explaining how to do it and showing specific software repositories from which to obtain the components.


  I believe my build environment didn't quite match the author's.  He suggested Debian Bullseye (11) as a starting point with 2GB RAM and 20GB disk.  I tried an RPI, WSL and Debian/AMD64.  I believe I had all the steps working but could not get them all to work on the same machine.  In the end I stopped.  I have the software, I know what was built and and I know how it was built.  So it is a very satisfying achievement.


Monday, 28 March 2022

RISC-V: Initialisation and C run-time

Start Simple

Our simplest assembly program simply exits cleanly, calling Linux to return to the Operating System.  We can assemble it to an object module and link it as an executable successfully.  We check it works by testing the return code.


Save Return Address and pass Arguments across

When we write C programs there is an initialisation routine which is usually called something like crt0.s, which carries out initialisation for us.  My starting point for crt0.s is a program which saves the return address in the stack, which has already been setup for us.  As we exit the program using an OS call this isn't really necessary but I feel this is a good thing to do.
Next we can initialise the command line arguments which are passed  from the OS in the stack.  We put them in argument registers a0 and a1.  We can now call the C function main.c. 
Providing my main.c program doesn't contain any clib subroutine calls it should work as the sample below shows.  crt0.s calls main.c to add up a few numbers.  main.c returns the answer which crt0.s passes back to linux in the return code.


This is very good, we simply have two object modules crt0.o and main.o linked together into an executable which runs.  In fact I don't think we need to save the return address or setup args in crt0, we can just call a "pure" C function and it will run.  Our main.c function can make linux syscalls, but isn't allowed to use clib (stdio.h etc).  

Using assembly subroutines to do I/O for my C program

The example below shows a main.c module which has command line arguments passed to it from crt0.s and calls my own assembly write.s subroutine to display the first command line argument - which is the name of the invoking command  ./crt0.


Conclusion

The next logical step is to make our own library of c functions.  On previous occasions I have tried to build / use newlib, but without success.  The situation remains unchanged.  I think I have found a better newlib version to use but I would be advised to try building it on ARM before RISC-V.

However, we have made excellent progress and have a better understanding of the C environment.