Labels

Showing posts with label risc-v. Show all posts

Sunday, 8 February 2026

VF2L: Nginx

 Intro

Previously I have found that Docker works well on VF2L even though the server is not very powerful.  VF2L doesn't include Docker-Compose and it was educational for me to use command line tools.  There are limited pre-packaged images available for risc-v, but this isn't an issue as Alpine, Debian or Ubuntu can be used as a basis for installing software packages.

VF2L is convenient to use as a testing ground and I decided to try out nginx here even though I could use Docker on RPI or Windows where more docker capabilities are available (compose, desktop, OMV etc).

Proxy Servers

I don't have a good understanding of Proxy Servers.  Originally they were used so that a number of local clients could share an Internet IP address, more recently this has been replace by NAT (Network Address Translation) but proxy servers are still used by some to cache pages, filter available sites and for authentication.  This type of proxy is known as a forward proxy server. In contrast reverse proxy servers accept requests from the Internet and pass them to appropriate web / application servers for processing.  They protect internal servers from malicious users and provide SSL certificates and load balancing.  The title "proxy server" is used for either forward or reverse proxies, which can be confusing.


Nginx

Nginx is the leading proxy server used currently.  It provides a web server, reverse proxy, load balancing and caching. I noticed that it has an official Docker riscv64 image and decided to try it out on VF2L.
It was as simple as typing a docker run command to download the software and spin up a container.  I can then immediately access the nginx placeholder home page.  It only took a minute!

The nginx container runs on a stripped down debian image (126MB) and I needed to install "nano" so that I could create my own test home page in /usr/share/nginx/html/index.html.

After a little experimentation I configured a more useful container.  This has two volumes "html" for  webpages and "conf.d" for the nginx configuration file.  As these volumes are provided from VF2L I can conveniently edit the files on them outside the container then reload nginx in the container to update the configuration.
I also prefer to alpine linux (52MB) as a base over Debian for Docker servers.
As VF2L is a test server I allocated port 80 to be available for the web server. 

Nginx web server configuration

I started by creating an nginx web server.  This is very simple.  The default.conf file simply says that the server should listen on port 80 and the home page is to be found at /usr/share/nginx/html.
In my browser I enter the VF2L ip address and the container returns the ...nginx/html/index.html webpage from the server.

I added a couple of extra locations.  This provides the ability to setup separate web page mappings.

The URI http://192.168.0.25/second.html maps to ...nginx/html/second.html.
http://192.168.0.25/third/ maps to ...nginx/html/third/index.html.
I found it a little confusing that nginx adds in the location (e.g. /third/ ) to URI but this is useful.

nginx proxy server

Setting up a proxy server is just as easy.  I added a location /pi/ in my server configuration and specified using the proxy_pass argument that requests should be directed to my application server (192.168.0.41).
I also had to add a folder ..../pi/ on my application server containing the web page.
Now the request http://192.168.0.25/proxy/ returns the web page ...html/pi/index.html

nginx is also kind enough to allow you to setup multiple web servers in a single instance. I setup a second VF2L server on port 8080.

A request http://192.168.0.25/proxy/  is directed to "myproxied" and the page /usr/share/nginx/html/proxy/index.html is returned.


External Access


Of course the main purpose of a reverse proxy is to route requests coming from outside the local network.  As a test I setup my router to forward port 8080 to VF2L.  
Now I can enter my external ip address and add "/pi/".  My router sends the request to VF2L which looks at "/pi/" and forwards it to //PI41 which returns the web page html/pi/index.html.


Outro

This experimentation with nginx gives me some basic practical understanding of reverse proxies.  They are particularly useful for docker containers as there may be many http(s) ports in use on different containers and nginx can forward requests to the appropriate destination for processing.
There is a load more functionality which I can look at in nginx (SSL in particular) and I haven't created anything of long-term usefulness.  This sets me up well to use nginx with other docker applications, in the first instance this could be an opencloud or nextcloud server.

Sunday, 1 February 2026

Docker on Risc-V

 Intro


My most recent  Risc-V development board is the VisionFive 2 Lite.  It isn't particularly powerful, but is probably similar to a RPI-3.
Interestingly the VF2L image comes with docker included.
I decided it would be useful to see how this compares with my other docker setup PI43+OMV


Images Available


There is an Docker Official Index of 48 riscv64 images as of January 26.  There are various programming languages (Go, Ruby, Perl, python etc), a few OS guests (Debian, Ubuntu, Alpine), some webservers (Apache httpd, tomcat, nginx) and some others mainly technical utilities and a few applications (e.g. nextcloud).


Other examples have been created, usually, they are geared towards multiple architectures and include riscv64.  For example I wanted a container I can SSH into so I googled "docker riscv64 ssh" and found woahbase/alpine-ssh.


This is based on the alpine docker image.  I ran the image to build a container and I was able to ssh in to use it.  This is excellent.
An alpine image is only 7MB size and including SSH only increase it to 14MB.
Docker doesn't create a complete VM, it uses the linux host kernel and syscall interface to provide an environment.
Alpine linux comprises a minimal set of utilities to make it useful, so it combines well with docker and is widely used.

Add applications to an image


Previously on my PI43:OMV server I have used docker compose to create images.  I have pasted in configurations and used compose to build an image and run the container.  I dont have docker compose or "standard" images on VF2L so I need to think and learn a little bit more about docker.

For my images / containers I start off from a minimal Alpine Image. I run this image as a container and I can access the container through a shell, enabling me to install software, create files, bring up Services etc.  

My first experiment was to create an Alpine lighttpd container.  I started by running a "raw" alpine:3.23 image.
I needed to add the openrc package plus a couple of extra commands allowing me to start services (this is a wrinkle in alpine setup).
I could then add the lighttpd package and start the web server on port 80.
In a web browser I can see the lighttpd installation placeholder page.


Create a lighttpd image


Now I know how to configure a container running a lighttpd webserver I need to create a new image including lighttpd which I can start up as a web server.

To do this I create a "Dockerfile" which contains commands to execute whilst building the image.  These can include software installation using the Alpine "apk add" command and bringing up Services.  A working image includes all necessary software (executables, configuration files, working storage etc).  Based on the interactive setup I used the Dockerfile as shown here to build a "alpine-lighttpd" image for my webserver.
 
There is a small downside which needs to be dealt with; the raw image has no persistent storage.  The container uses temporary files for all the storage it needs and this is deleted when the container is removed.  So if I added some html files to the container they would be lost when I removed the container.

The answer is to create one or more volumes to contain our data.  For my lighttpd web server the home page will be stored at /var/www/localhost/htdocs/index.html.  with the command "docker create volume VarWwwLocalhost" I created a volume.  I then mapped the volume to the home page directory in my docker run command which starts the container.
Now I could add index.html and other web pages within the container and they remain available each time the container is loaded.

In fact I can also access the volume from VF2L outside the docker container so I can look at or edit files from VF2L before starting the container.  My first effort is shown below.
A vital feature of docker is that it allows you to redirect ports.  When I run the lighttpd container I specify that I want to map VF2L port 8080 to my container port 80.  Then any URL which specifies port 8080 is directed to the container port 80.


Outro

It is very useful to be able to create my own images or amend standard images for my requirements.  Docker is an excellent tool for making these images and running the associated containers.  VF2L has proved itself capable of running docker and docker containers.  It is wonderful to separate the host OS linux from the image so that I am in total control of the container.  VF2L runs StarFive linux but my images are built on alpine, but they could be built on Debian or Ubuntu.

So far I have built containers for lighttpd (described above) and for ssh access so that I can ssh into a test alpine server.  I have also quickly started up nginx and nextcloud containers to experiment with them.  I am quite amazed at how quick and easy it can be to start a complete application.  If there is an appropriate image it is much simpler than adding linux packages to the operating system and configuring them.


Tuesday, 6 January 2026

VisionFive 2 Lite

Purchase

Back in August I was seduced by an advert for the VisionFive 2 Lite.  Previously I purchased the VisionFive 2, which was, in my opinion the first properly useable RISC-V SBC.  The new offering has a similar spec but is priced much more reasonably.  It is in the same price range, but not quite so powerful as a RPI3 or RPI4.  I definitely wanted one to try out and, hopefully, to put it to use.  


Initial setup

The board arrived in November so I wanted to set it up asap.  Installation is very straightforward.  An Ubuntu desktop image can be downloaded from rvspace.org and copied to an SD card using win32diskimager.
I attached a screen for first boot, the system came up very slowly to show the GUI console.  I changed the configuration to stop the GUI loading which speeds the system somewhat.  I also enabled root SSH login so that I can comfortably run a headless server here on it.

I was able to run apt upgrade to bring software up to date without problems.  Initially I installed lighttpd, nano and samba, which all work seamlessly.

RISC-V packages are not available for all software, for example I couldn't install vncserver.  However I did install xrdp which I could use instead if I want a GUI.

Comparison with VF2

The rvspace website doesn't really distinguish between VF2 and VF2L OS software. I was able to take the SD card from VF2L, insert it in VF2 and it booted fine.  The boards seem to have similar performance, the main difference is that the newer one is cheaper.

Assembler

Of course the main feature of a riscv64 computer is its assembly instruction set so it would be remiss of me to not to check whether it is easy to write assembly programs.  Modern day hero Bruce Hoult is a RISC-V evangelist and provides some simple instructions.

I installed gcc as suggested, copied the program into hello.S and I was immediately up and running with assembler.☺☺☺

Docker

I noticed that docker is already installed on VF2L, which is great.
I tried the docker hello world example and it works fine.☺☺☺


Conclusion

VF2L is a good product, perhaps comparable with a Raspberry Pi Zero W.  It will be interesting to see what software it will run.  As the RISC-V universe grows more software will be adapted / available to run.

I think I will aim to setup standard linux packages to run on it with an emphasis on using docker where possible.


Thursday, 13 March 2025

XV6 RISCV OS

 Intro

The Hackaday tutorial to write an Operating System from scratch provided a wonderful inspiring introduction.  It explained many features exclusive to supervisors: context switching, system calls, paging, scheduling, privileged instructions and user shells.

XV6 was written by MIT for their OS Engineering course.  Originally they used Unix Version 6 running on a PDP-11 computer but later created XV6 which now runs on x86 and RISC-V.  XV6 is based on the classic Unix V6 from Thompson and Ritchie and is therefore similar in architecture and design to Unix, Linux, MacOS etc.
As a teaching system it contains a subset of relevant features and is easier/quicker to build.

I first came across XV6 as Michael Engel had developed a 32-bit variant which ran on Nezha RISC-V hardware.  I decided to implement XV6 on QEMU rather than on Nezha as it is easier to use an emulator initially.  I may try to build on hardware eventually.

Environment

XV6 can be found on github which has some terse build instructions.


My Raspberry Pi PI41 already has QEMU 7.12 installed.  It is necessary to have riscv64-softmmu configured tor "complete system emulation including an emulated MMU for running bare metal programs or OS" rather than "linux user mode" which just translates linux syscalls to host calls.  Since the executable qemu-system-riscv64 exists I have the correct version.

The riscv-gnu-toolchain provides a C cross-compiler and linker so that RISCV executables can be built on RPI and then executed on (QEMU virtual) RISCV hardware.  The instructions make it look very straightforward.


In practice I struggled somewhat to get a working version until I found a note in the instructions that I needed to configure a switch "--enable-qemu-system" to create a complete/correct toolchain.

There is a lot of work to do to build all the necessary executables.  On my RPI4 it took about four hours execution time and utilised 6.6GB.


XV6

Once the QEMU and Toolchain pre-requisites have been successfully completed it is simple to build XV6.  The Makefile builds a system and executes it in QEMU.  On completion we can see the magical '$' prompt from the shell command line.πŸ˜€πŸ˜€πŸ˜€πŸ˜€


Since it is a unix-style OS we have an "ls" command to display files in the current directory.

Outro


We leave the story at this point.  We have a simple working OS for which we can write user programs.  We can check out many Unix features including forking, multi-tasking, pipes, inter-process communication on our simple system.  We can add extra capabilities and modify the kernel if we want to.
In practice this programming will be more demanding than building the system.  The kind folk at MIT provide an XV6 manual and a series of labs to learn about (Unix) operating system capabilities.  There is an awful lot I can learn if my C programming is up to the task.


Monday, 17 February 2025

RISC-V : Bare Metal OS : 3 User Applications

 Intro

We have some basic capabilities in our supervisor now and we can turn our attention to user applications.  We can already run multiple independent processes with their own registers and stack.  We need a few more features to be able to run user applications as processes within our OS.

Firstly we need a virtual address mechanism so that each process/application can have an address space.  The same virtual addresses can be used in multiple applications but these will map to different physical addresses so that applications dont interfere with each other.

Secondly we need a mechanism for creating and running user applications.  Our applications will be written in C and the compiled executables will be loaded at the same time as the kernel.

Finally we need the ability to switch between supervisor mode and user mode so that applications dont have the capability to interfere with each other or the kernel.

Virtual Memory

Hardware architectures incorporate methods to implement virtual memory within their specification.  With 32-bit addresses from
0x0000-0000 to 0xffff-ffff each program can have a 4GB virtual address space.  The physical address space may be much smaller.
Processor hardware (not the Operating Syestem) provides the ability to translate virtual addresses  to physical addresses.


This implementation uses the 32-bit RISC-V implementations called Sv32.
Memory is divided into 4KB pages.  Virtual addresses are mapped to physical memory using a two level page table.
The first level page table contains 1024 4 byte entries pointing to upto 1024 second level pages.
This structure allows upto 1024x1024= 1M pages  which equates to 4GB virtual memory.
If the kernel+data starts at 0x8000-0000 and is 2MB in size the first level page table will just have the 512th entry completed pointing to a single second level page containing entries for 2048 data pages.

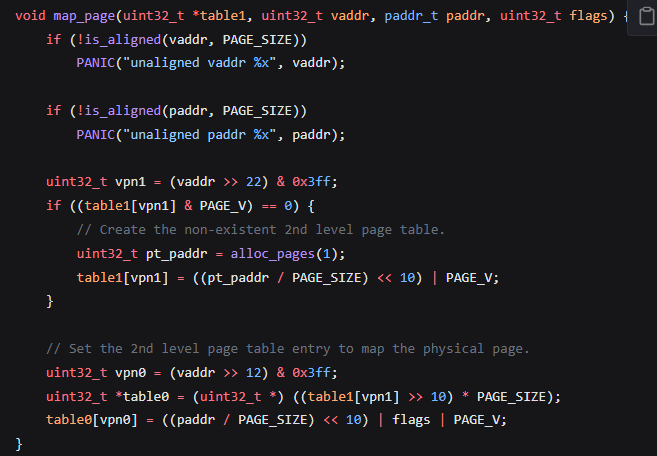
Page table entries are setup using the map_page function which looks at a data page's virtual address to determine the associated 1st level table entry. If this is zero, it sets up a new 2nd level page.  It then puts a pointer to the data page's physical address in the table.
In this way Page Table nodes are setup for each page in a process.


In our implementation we use virtual addresses for the kernel which are the same as physical addresses.  This allows kernel programs to work regardless of whether virtual addressing is on or off.
When we create a process we must map all the kernel pages into the table so that they can be accessed by the process.
We must also put the pointer to the start of the page table into our process structure.

Now comes the magic.  When we context switch to a new process we simply change the satp  (supervisor address translation and protection)  register to the appropriate page table.  Now the processor will automatically translate the processes virtual addresses to actual physical addresses using the page table.
Note that the sfence instructions ensure that writing the new satp is completed as a single operation without interruption.
This is awesome 😁😁😁😁

Application

I confess I got a bit lost setting up the application, partly because the instructions aren't so clear and partly because my attempt didn't work.

First we set up a basic program user.c which has a function start. The linker specifies that the program starts at 0x1000000 and that start is the entry point.  The start function sets up the stack, calls main to carry out functions then calls exit which is initially an infinite loop.

main is defined in the file shell.c and initially it just loops forever.


The build script is full of weird magic.  First we build the application as shell.elf.  Then we convert it from elf format to a raw binary and THEN we convert it into a format which can be embedded into the kernel.
Finally the kernel is build, including shell.bin.o which is our application.

Run Application In User Mode


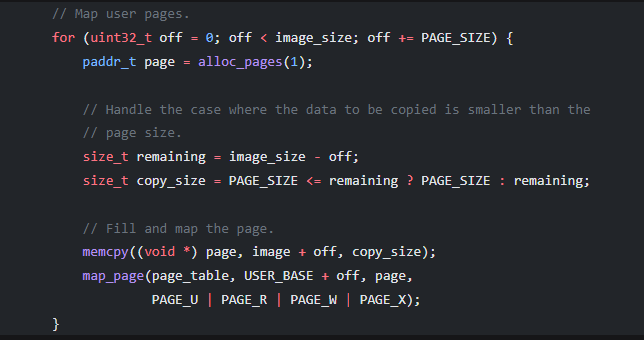
Now we have the program we want to run appended to the kernel, we can create a process by  allocating memory for the program, copying the program into the memory pages and adding page table entries.  The jiggery pokery in the build script gives us the information we need regarding the program location within the kernel.  We now have a process containing our application ready to run.

Finally we need to switch to user mode which is accomplished with the privileged sret instruction.
This is executed in the user_entry function so is executed as soon as the context switch to the user program is completed.  The sepc register contains the program counter which sret jumps to.

Our first program is pretty dull, we can only look at memory and status registers to see what it is doing.
Of course in user mode we cant read/write from/to the console as that is the supervisors role.  We need to be able to execute system calls.


System Calls

System calls are familiar from assembly language programming.  You ask the kernel to do some work for you.  In this example, we ask the kernel to read a character from the console and return it in an integer varaible.
You specify a number of parameters then issue an ecall instruction.  ecall causes an exception which the kernel must handle.
In this case the only argument we pass is  the ecall identifier SYS_GETCHAR


Within the kernel, the exception causes the  handle_trap function to be executed. 
By checking CSRs handle_trap determines that an ecall is responsible for the exception and invokes handle_syscall.


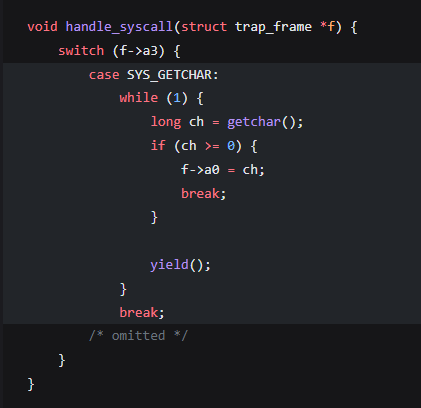
 handle_syscall looks at the identifier, and sees that it is being requested to read a character from the console.  Using its own getchar() function it makes an SBI call to see whether a console character is available so that it can return it to the user.  Note that the function loops until a character is available.  After each check it yields so that other kernel processes can take their turn.


User Shell

Finally we enter familiar territory.  We can write a C program to display a prompt, get some input and display a console message.


Outro

The tutorial has a couple more chapters demonstrating disk i/o and a simple file system.  These are the essential next step if you are writing a disk Operating System.  However I have learnt so much on this journey that I will stop here.

There is a complete working copy of "OS in 1,000 lines" on github which I have tried out.
It gives you a nice warm feeling to be able to execute commands from the shell, even though they are very basic.

Looking back I have found out so many new concepts:
  • QEMU  provides a pretty realistic RISC-V environment for investigations.  It needs openSBI to initialise the "virtual hardware" for us.
  • openSBI is another level of software to consider, it runs in M-mode (machine) and does all the hardware specific (memory, interfaces, peripherals) initialisation for us.
  • openSBI calls allow programs running in S-mode (supervisor) to use hardware functions such as writing to the console.
  • We can write our Operating System in C.  The occasional assembly language instructions we need to use for privileged instructions and initialisation can easily be specified using inline assembler.
  • Our OS could use the C standard library.
  • Our OS is running in S-mode and can access CSRs (Control and Status Registers) to find the cause and type of exceptions and other information.
  • We define two areas of storage for a stack and free memory.  We allocate memory in 4096 byte pages.
  • A process has its own stack and memory.  We move between processes using a context switch.
  • RISC-V hardware converts virtual to physical addresses based on a two level page table.
  • Switching to user mode protects the kernel and isolates processes from each other.  It is simple to implement.
  • We can easily write a user shell to allow us to use basic functions 
As a follow on I may investigate xv6, first as a QEMU VM, followed by running it on Nezha or VisionFIre2 hardware.

Thursday, 13 February 2025

RISC-V Bare Metal OS : 2

The Story So Far

We have made an excellent start to our OS, we have loaded SBI, initialised harder, booted the processor and communicated with SBI to print a Hello World message.  In this installment we will do some consolidation making our environment useable.

Kernel Panic

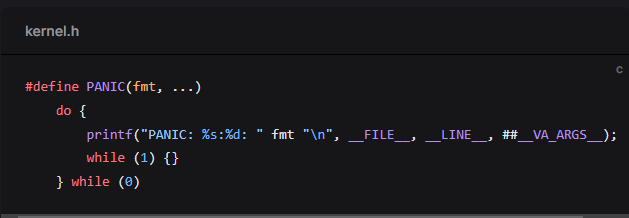
If our kernel crashes, we want it to print some diagnostic information.  We define a short macro called PANIC which prints out an error message.
Because PANIC is a macro the text is inserted inline before compilation and the values for source file and line numberfilled in so they can be printed if PANIC is called.
The while(1) specifies that the program loops once it has printed the message.  do...while(0) specifies that the block is only executed once.

When the PANIC macro is included in our kernel it causes the "booted!" message to be printed out 

followed by the program source file name and number.  This simple mechanism will be very helpful in debugging our programs if we put PANIC calls wherever necessary.

Exceptions

An exception will occur if our processor encounters serious errors such as invalid instruction, invalid memory address (page fault) or a system call.  When an exception occurs the values in various communication and status registers (CSRs) provide details to help resolve the issue.
User mode applications are not able to access CSRs but if the kernel operates in supervisor mode it can read and write CSRs to deal with problems.  Thankfully openSBI initialises our machine in supervisor mode so our kernel can process exceptions.


Risc-v also incorporates machine mode which deals with hardware level issues.  We are not concerned with these as we building a kernel and openSBI has already configured the platform for us.  I may return to M-mode if/when I look at bare metal programming on a real risc-v processor, for example the VisionFire2.

We will configure our kernel to print CSRs and stop when it encounters an exception.

First we can define a couple of macros with inline assembly language so that we can use privileged instructions CSRR and CSRW to respectively read and write CSRs.


Next we define a handle_trap function which obtains the values of three CSRs, prints them and uses a PANIC macros to stop processing.


We also setup a function called kernel_entry which saves registers then calls handle_trap. Near the start of our kernel we setup the exception handler by setting the stvec register to point to kernel_entry.

The kernel then executes "unimp", a pseudo instruction which triggers an illegal instruction exception.

When our kernel runs it encounters the illegal instruction, which triggers an exception.
Processing jumps to the address in stvec, which is the kernel_entry function.

kernel_entry saves registers then calls handle_trap to retrieve CSR values and display them using the PANIC function.  These values can be used to determine what caused the exception error.  In the example above we can see that the program counter sepc was at address 80200134 when the exception occured.  scause=2 indicates an illegal instruction. Using the llvm-addr2line utility we discover that address 80200134 corresponds to line 135 in kernel.c.  Looking at kernel.c we see that the "unimp" instruction is indeed at line 135!  MagicπŸ˜€

Allocate Memory

We use a very simple allocation system which allocates 4096 bytes (hex 0x1000) of physical memory for each request and never frees up memory after use.  Each time alloc_pages is called it returns the memory address __free_ram and increases __free_ram by 4096.
Our test program calls alloc_pages twice, the first time two pages are allocated starting at 8022-1000 and then a page is allocated at 8022-3000


Physical memory starts at 8020-0000 and we start allocating physical memory at the initial value of __free_ram 8022-1000 which follows programs, data, variables and the stack.


Process

Now we need the concept of a process.  The  kernel needs to be able to run more than one application at a time.  Each process will have its own execution context (registers etc) and resources (address space etc).  We need the ability to setup a process for each application and to switch between the contexts to execute different applications.
A Process Control Block (PCB) structure is defined which contains pid, state, stack pointer and an 8KB stack.


Our kernel has PROCS_MAX =8 so it can run 8 processes.
A PCB structure array procs contains 8 entries.
The create_process function is quite simple.  First it checks whether there is a free process slot.

If there is a free process slot it initialises the stack pointer and saves (initialises) 0s to the stack for register values.
These values will be restored to registers the first time the process is started.


The context switch is also very simple.  First it saves "callee registers" (ra, s0-s11) next it switches to the stack pointer for the new process and restores its callee registers.


Now comes the real magic.  We define two functions proc_a_entry and proc_b_entry which will do the work.  We keep this first test simple, each process prints a character then switches to the other process.  A delay is incorporated to stop characters coming out too quickly.
Next, processes proc_a and proc_b are created and the functions start address is passed over.  This will become the program counter (PC).
Finally proc_a_entry is invoked.  It prints 'A' and context switches to proc_b.  The switch includes restoring the return  register for proc_b so the context_switch returns into proc_b  which prints 'B' then switches back to proc_a.
The processes continue to swap and a string of A s and Bs is printed.
I think this is awesome.  
The actual C programming is a little complicated for me because it uses pointers so much, but the result is wonderful.😁😁

Scheduler


Our first approach to context switching was awesome but we certainly dont want each process to specify which process will run next.  Instead, at a convenient time we tell the function to yield. The yield function is responsible for scheduling another task to run.  Note that functions are still running within the kernel and the programmer has responsibilty to pass control to the scheduler.  I believe (not sure) that you can use multiple yield functions at various points in a function.

The yield function contains the scheduler.  It steps through the Program Control Blocks until it finds another process that is free to run and then does a context_switch to that process.  If it doesn't find another process it continues with the current process.
This is beautifully simple 😁

There is a little extra work required in the exception handler to keep track of the current stack pointers but it isn't a major change (well I don't really understand it) so I wont include it here.


The Story So Far

We have made awesome progress on our kernel; we can boot it up, write output to a console, use standard library functions (ours are somewhat simplified).  We can also deal with crashes, allocate memory and run / schedule multiple processes.
So far everything is running within the kernel which is running in supervisor mode  Next we must prepare the ability to run user mode applications and prevent them adversely affecting the kernel or other user programs.