Labels

Tuesday, 19 July 2022

LilyGo : Load Images from SD Card

 My LilyGo Genius Remote (smarter than a smart remote) is becoming more sophisticated as I investigate and utilise extra features.  It almost seems strange that I haven't used the SD card previously as programming in the non-Arduino world is often pre-occupied with files.
Lily comes with a demo sketch SD_Test which shows file and directory functions on an SD card so it was an easy matter to incorporate the SD card into my sketch and list / read  files.

As Lily has a small graphics screen, the factory_test demo sketch displays a logo as Lily starts up.  Data for the picture is provided by a header file in the demo sketch containing pixel values which are compiled with the sketch and loaded into a flash memory (PROGMEM) array so they can be displayed using the displayWrite method in the TFT_eSPI library.

To make my own picture I can use a utility program ImageConverter 565 . The screen size is 240w x 135h so my first step is to find an image and, using MS Paint, cut it down to 240 x 135 pixels, which is a rectangular shape.  ImageConvertor will the convert it to C format which is a statement defining a PROGMEM array with 32,400 16 bit data values.  I include this file as a header within my sketch and can then display it on the screen.


I potentially want to display a variety of pictures on the small screen so I would prefer to load the images from my SD card at run-time rather than compile and download them in a sketch.  ImageConverter can also create images in a ".raw" file format. The screen size is 240w x 135h and each pixel is 16 bits.  The RAW file contains no header or format information, just the pixels, so the file created is exactly 240 x 135 x 2 bytes = 64,800 bytes.

I remove the SD card from Lily and copy my image files on to it.  I like the fact that it is exactly 64,800 bytes, nothing at all is added to the file.  To load the image I simply have to read the file into an array and display it.  The ScreenBuffer array is 32,400 bit values so I have to read in two bytes to each array element.  I can then load an image whenever I want.


I cant stress enough what a wonderful hardware package LilyGo is for ESP32 development.  I think LilyGo are a maker / hobbyist company, but this device is potential usable in shops as a hand-held terminal.  I hope that this box or a similar one continues to be available.  As an added bonus the demo sketches show you how to use all the functions so you don't have to spend time looking for datasheets, pin numbers, libraries etc; making it childsplay to provide more functions.  I love it.

Monday, 11 July 2022

LilyGo Remote

 Previously I spent some time setting up my wonderful new LilyGo T-Display Keyboard functions, mainly to control my music server, similar to its pre-decessors.  It has a lot more potential and I have been starting to add features.

Screen Saver

As Lily works on battery when not connected to USB there is a limited amount of time before it needs to be recharged.  It is sensible to turn off the screen when not in use.  The factory_Test sketch which was provided with Lily shows how to turn the display off and put ESP32 into deep sleep mode


The first two commands DISPOFF and SLPIN blank Lilies LCD display and turn off power to the LCD.  I struggled to find documentation for these commands.  In fact they are well-documented in the ST7899V datasheet which corresponds to the LCD.  I can turn the screen back on with DISPON and SLPOUT commands.

So now I need to setup a proper screen saver.  It should wait until Lily has been inactive for a short while, say a minute and power down the screen.  When a key is pressed the screen should be powered on, allowing the user to continue.

I need a timer function to do this.  There are generic Arduino timer libraries but it is better to use the ESP32 timer function.  We set up a timer with an alarm so that the screen blanks after 10 seconds (during testing, 1 minute for real use).  If the user presses a key either before or after the screen blanks the timer is reset and the screen is restored so they can continue. 


This works very well, keyboard input is still possible when the screen is off so there is no delay in waiting for Lily to wakeup.  I have added some menus for favorite albums, radio stations and chart playlists so it is useful to have the screen on for this.  For some of the other functions I dont usually need the screen.

Hibernation

If Lily is not in use it can be put into a deep sleep where wifi is turned off and the CPU is using little current.  Initially I investigated shutting down functions before sleeping then waking up with an external interrupt when a button was pressed.  However I decided to simply set up a timer so that the ESP32 goes straight into deep sleep after an hour of inactivity with no wakeup capability.  If Lily is in use it is likely that a key will be pressed within an hour.  It only takes 5s-10s for Lily to start up so pressing the restart button on first use isn't an issue.

With Screen Saver and Hibernation working Lily is behaving like a real computer!  The battery lifetime is now at least two or three days.

Saturday, 9 July 2022

RISC-V Assembly input

 Previously I have managed to write an assembly program to display a range of memory locations.  A small next step is to work out how accept input to the program.  As I am using GLIBC these functions should be straightforward, in fact the simplist approach is to write a C program, see how the compiler has converted it to assembly then adapt it for my own program.

Character input

Step 1 is to read in a character from the terminal. Linux uses "blocking" input by default which means that you need to hit Enter after the character(s) before they are processed.


Command line arguments

Step 2 is to read input from command line arguments into the program.  Linux puts the arguments onto the stack for me - probably as part of the crt0 initialisation so I just need to decode the structure from the stack.


String Input

Step 3 is to read in a string from the terminal.  I can either use the stack to store the string or data storage within the program, I checked that both worked.

Non-blocking input

Finally I tried non-blocking input.  This required a bit more investigation within the C environment.  I found a beautifully clear tutorial written by Paige Ruiten as part of his snaptoken project to implement the kilo text editor.  I tinkered with his example to minimise it so that I could look at the assembly.

When someone shows you what to do it isn't too difficult but I wouldn't really like to work it all out for myself.  In fact I didn't implement this in assembly, but it is all ready for when I want to use it.

Libraries

Whilst working with these C and assembly programs I did think about how I use libraries.  I am using GLIBC in my assembly programs because I dont want to write lots of I/O routines but generally speaking this means I don't need to write assembly myself since my programs could be written in C.

However, using RISC-V, one of the benefits is being able to use native RISC-V assembly so I will continue to try a little bit.

If I write anything significant I should put it in a library.  I followed a very good opensource.com tutorial to familiarise myself with creating and using a Linux library.

HA : ESPHome : RFID Reader

 Previously, I installed ESPHome with a simple indicator, showing whether a GPIO pin was hi or lo.
Many devices we use with Home Assistant (HA) have specific home automation interfaces.  ESPHome extends HA functionality by providing an interfaces for many more sensor components which can measure the environment somehow.  ESPHome provides the capability to interact with RFID readers and cards / tags.

I purchased three RC522 readers on Ebay and they turned out to be very simple to setup.

I am using a ESP32-VROOM-32 as my ESPHome server device and it communicates with RC522 using SPI.  ESPHome is configured using HA.  Firstly we define the pins to be used for spi.  We can then add the pin required for RC522.  Using the ESPHome UI we tell HA to install this configuration and it spends a couple of minutes compiling an image and downloading it wirelessly to the ESP32.  I connected the 4 data pins plus 3V3 and GND from the ESP22 to the RC522 and ESPHome showed that it was communicating 😀😀😀


 The next stage is to present a keyring-tag or card to the reader.  When you do this the ESPHome console log shows the id.  You can add each tag uid as a binary sensor within ESPHome and then look at them on a dashboard.

Once we have binary sensors we can set up a HA automation which is triggered whenever the binary sensor state is changed.  My  initial experiment instructs the Google Nest Mini speaker to inform me when Tag 1 is presented to the reader and when it is removed.

There are ways we could use the cards.  I could present a card to the reader when I enter or leave the room and everything could be setup for me.  Baby Harry could have a variety of cards to do things when he wants them. 
I did check whether NFC on my phone is acceptable to the reader.  It does register and send a tag id to HA, but the tag is different each time, possibly as it uses more sophisticated security, so it isn't much use to me.


Wednesday, 22 June 2022

LilyGo T-Display Keypad


Rationale

Some years ago I setup a home music server based on Linux Music Player Daemon (MPD) with a web front-end to select and control music playing on my HiFi separates system.  Typically I would choose music to play using  my iPad or phone browser.
As an add-on I developed an ESP8266 attached keypad which also allowed me to control the music.  I call it my "Button" although it has a number of buttons/functions.  It is particularly useful for pause / resume, next type functions and to start my favourite playlists and radio channels.  Effectively it is a clever remote control tailored to suit my needs.
The original "Button" version 1 has a USB cable to power the ESP8266 so it isn't very portable; typically this doesn't matter but I did develop version 2 which has a rechargeable battery.  I found this cumbersome and I haven't used it much.  Both Buttons have a tiny LCD screen to display status info but this isn't very visible as I have had difficulty creating suitable enclosures to accomodate ESP8266/keypad/displays.


Recently I have implemented my Home Assistant (HA) Server, including MPD for music server control and Arduino based MQTT communication.  This allows me to control my HiFi from an ESP device and I added it to my "Button" software for testing purposes and it works fine. It works in parallel to my original application and has the potential for more functionality / flexibility.

In advance of doing more work on the button I looked out for a case for an ESP device and keypad which would be more compact than my home-made devices.  I was excited to stumble on the LilyGo T-Display Keypad on Aliexpress.
It is based on the ESP32, has a mechanical keyboard, a small TFT display and a rechargeable battery all in a neat case.  This is an absolutely perfect replacement for my old buttons and I ordered one immediately.

First look

Connecting the USB-C cable causes the ESP32 to start up.  A simple display appears allowing you to display wifi networks, input voltage or put the processor into a deep sleep.  There are two buttons adjacent to the TFT screen for these controls.  There is also a reset button on the top or right of the case.
Like a remote control there is no on / off switch which feels very strange to me.


The LilyGO github repository provides you with instructions to load the TFT library and example sketches into your PC Arduino development environment.
From there it is easy to compile and load the Factory_Test sketch which is the same one as installed on delivery.  This is awesome, nothing makes life easier than a working example containing many of the features of the device.  In particular it provides information on:
    All the pins needed for keypad, TFT, buttons, SD Card
    Arduino libraries for all hardware
    Example code to use the TFT display
    Example code to find the input reference voltage (useful for low battery check)
    Example to display a bitmap on the TFT
    How to put the ESP into deep sleep

In addition there are sketches for
    Example code to use the keypad
    Test SD functions to create, view, delete file and directory list.
    A rather good animated eyes sketch which makes really brings the screen to life.

This makes my life so much easier and saves me many, many hours looking at schematics, finding libraries, writing code to set up everything.

Application One

My first application requirement is clearly to setup similar functionality to the "Button".
Firstly I amended example code to read input from the keypad and display messages on the screen.  I then added wifi and websockets based on "Button 1" code.  Using a case statement I could then easily process key presses and send websocket messages to PI40 (which processes websocket input) for processing.  Within a few hours I have a working example for the "Button 3" based on the web page which I usually use.

I added and tested MQTT, using Home Assistant (HA) as my MQTT Broker.  This allows me to communicate with HA and use a HA script or automation to control any function HA function.  This is an extremely powerful extra.  On my webpage I cannot control amplifier volume since the amp is old and uses an IR remote control.  However my Broadlink IR remote is controlled by HA and I can add volume up/down buttons to LilyGo.

The LilyGo battery runs out after about 24 hours if not recharged, so I set up a button to show battery percentage / time remaining and another button to clear the screen.  This completes a basic setup which is a great improvement over my previous buttons and which I use in preference to my phone.

I cannot stress enough what a good product this is for me, both in terms of the hardware purchased and the software provided to help get started.  I shall look out for other products they can inspire me with.


Friday, 17 June 2022

Lu J Son

 Whilst on holiday, walking in the Pyrenees, we stopped for dinner at a lovely restaurant called El Montanes in Biescas.   As well as a wonderful dinner in a convivial surroundings the walls were decorated with some striking pictures.  As I was leaving I noted the pictures were signed by the artist LuJSon and I followed up on my return to England.

@Lu_J_Son is Tomas Langarita, who is from Zaragoza and may well teach there at the University. I contacted him via Instagram and found he has lot of beautiful work.  


In particular, in the restaurant I loved "8p.m.".  It is easily recognisable as lady on a sofa drinking a glass  of wine, with book shelves in the background.  There is a hint of Mondrian (who I dont like) in the white bookshelf grid.  The books are bright primary colours, neat but not regimented, random but harmonious, filling the top half of the frame.  The bottom half contains a grey sofa which is occupied by a lady, making herself comfortable with her feet up.  She is holding up a glass of good red wine which she is savouring.  Her posture, expression and mood are captured with a few straight line segments.  I think this is brilliant. I like the way that artists can capture meaning in single curves representing people or objects; this goes a step further capturing something extra from straight lines.  All the colours are outlined with black lines and it would be easy to translate the picture to stained glass fragments, joined / separated by lead joints (e.g. Sophie Taeuber-Arp work)

I have contacted Tomas and I may actually be able to buy this picture.  It would be lovely if this works.

In the meantime I have looked at more of his pictures some of which were at El Montanes....


Tuesday, 14 June 2022

HA : WLED

I purchased a WS2812B LED strip over a year ago.  The LEDs are individually addressable, allowing you to set up patterns on the lights.  I didn't get around to doing anything with them until I saw that they can be controlled using an app called WLED which in turn can be integrated with Home Assistant (HA).  I think the W in WLED stands for wifi; LEDs are connected to an ESP8266 which controls them and the WLED iPAD app allows you to configure patterns.

Arduino Setup

My first task was to setup an ESP8266 and connect the LED strip.  I used an article by mechatronics to guide me, it shows the connections are very simple.


I then loaded the example sketch, which uses the FastLED library, into ESP8266 and it works, without modification, displaying an attractive red / blue pattern on the LEDs .  Always a pleasant surprise when this happens😊

The sketch shows that displaying a pattern is simply a matter of putting correct colour values in the array leds[] and calling FastLED.show to display them.  They pattern can be made to change by adding loop to the sketch specifying how the pattern changes each time.  It gives me complete control of which LEDs are are used, what colours they are and when they change from a C program😊

WLED Install

WLED runs on an ESP8266 to control the strip.  It has a ultra-cool website URL kno.wled.ge  which provides the relevant installation instructions.  WLED is loaded into the ESP8266 using a utility esptool.py.  I downloaded esptool.py and WLED 0.13.1 to WSL then ran esptool.py to flash WLED onto the ESP8266.   ESP8266 starts up with an access point WLED-AP.  I attach to WLED-AP and go to address 4.3.2.1 in my browser to connect to the ESP program.

Now all I have to do is configure my Wifi network and password, then restart and I can access the browser app from any local network browser😊

WLED is surprisingly complicated to use; there are over 100 effects you can use to create LED patterns and a variety of colour palettes you can choose.  You can set the speed, select groups of LEDs and string a sequence of patterns together.  


Luckily there are various youtube tutorials to help you and kno.wled.ge provides a list.  I used a couple of tutorials by Dr zzs to give me the general idea.

WLED API

I dont find it easy to setup devices based on a graphical user interface, it is too easy to forget/overlook details.  WLED provides both HTTP and JSON APIs allowing you to control WLED remotely.  JSON is the newer, more complete interface which is easier to code / read so I concentrated on setting up some JSON configs.  Curl is used to send WLED API commands, as a simple example the following command turns the LED strip on.


In practice it is better to put the json into a file, the example below causes WLED to blink LEDs 30 to 40 in the strip between blue and green.
Now that I have a mechanism to program WLED I can create a variety of configs for the lights.  WLED allows you to setup presets to store configurations; once I have downloaded a configuration I save it in a preset.

HA and GA

There is a HA native integration for WLED making it trivial to include it within the system.  HA allows you to control individual elements, however I think it is easier to setup presets as shown above then invoke them within HA.


Now WLED can be controlled by running a HA script and I can set up a routing in Google Home for voice control of LEDs, job done😊


Sunday, 22 May 2022

HA: MQTT + Node Red


Message Queue Telemetry Transport is a lightweight publish / subscribe message transport.  For example Sensor hardware publishes values which the MQTT Broker passes on to all subscribers.
Alternatively a client can publish an instruction (topic) which wll be passed on by the MQTT Broker to all subscribers for action.
There are lots of MQTT resources/tutorials, for example at mqtt.org

Home Assistant has an integration for an MQTT Broker which can be utilised with a wide variety of devices. Typically, for me, the client will be an ESP8266 or ESP32.  For testing I use a NodeMCU ESP8266 and the Arduino IDE.

HA has an integration for the Mosquitto MQTT Broker which is widely used and very easy to install on HA. I used a good video by EverythingSmartHome. Once the install has completed the broker provides you with a screen where you can experiment, sending packets and listening to Topics.  This will be very useful going forward to watch messages flowing through the system.

I followed a good tutorial from emqx.com to setup a NodeMCU ESP8266 as an MQTT client.  It uses the ESP8266WiFi library and PubSubClient which is allows messages to be published / received.

Our inital sketch simply sets up wifi, sets up MQTT client and publishes a "hello" message which is promptly displayed on the Broker Topic Monitor.
The sketch is very straightforward so I have included it below.  
We dont have sensors attached on functions to carry out yet but you can see how easy they will be to add.


Node Red is a HA add-on / integration which allows you to configure how devices interact using flow diagrams.  I set up a simple test using my ESP8266 keypad and MQTT.  With the help of the Hook Up Guy I was quickly able to use Node Red to instruct HA to say a phrase when button 7 or 8 are pressed.  This isn't a trivial exercise and it is impressive that Node Red plus the wizardry linking it to HA makes it so easy.


HA : Practical Music Solution

 I can probably spend months tinkering with Home Assistant and Google Assistant without having something practical.  I need to remember that the solution needs to help me in practice rather than include clever esoteric features which I wont use.

Home Assistant

I settled on two HA dashboard screens, the first is for MPD playlists and the second for radio/music  streams.

My existing, excellent, solution for music is an RPI running MPD with an extensive music database.  In most cases I will use a webpage to choose music so I include this webpage on my dashboard.

Any specific selections I want to have under voice control are set up with an input select card.  Initially I set this up for three albums and a charts playlist but I can easily add more options if they prove useful.  Only these four music selections are available using voice control, but that is ok.  I do have voice control for general purpose changes such as volume up/down, next track, play, pause, shuffle on/off. 


My second screen is for Pure Jongo Job control.  Typically I use this for playing radio stations so I set it up for common stations I listen to together with a few music streams which I may expand later.  Jongos dont have so many control options but pause / resume will be important.

Both the MPD and Jongo options run through my Sony amplifier so I have options to switch between the two music sources and amplifier volume up/down.


Google Assistant

The Home Assistant configuration has given us various capabilities to control music using Linux Music Player and Pure Jongos.  However we had this capability previously and our main objective is to have voice control of sounds.  Home Assistant provides us with an automated IR (infrared) remote control to "press buttons" so the final piece is to add voice control.

Google Assistant controls some devices with voice and Google Home lets us setup routines for "Hey Google" commands which carry out a wider variety of activities.  Activities provided within Google Home are very limited for my devices; I can only turn lights on/off and tell the Nest Mini to say things.  However I can import all scripts from HA to GH and invoke any of them with a voice command.

This provides exactly what we need; as long as we have a HA script for a function we can invoke it using a voice command.  To start off with my Broadlink HA integration allows me to change the volume and switch between MPD and Jongo output and HA can pause / resume devices.
Google Home doesn't allow me to specify parameters / variables so I need to set up a script in HA for each playlist / album / radio station I want to control with voice.  Once these have been imported into Google Assistant I can easily add voice commands.

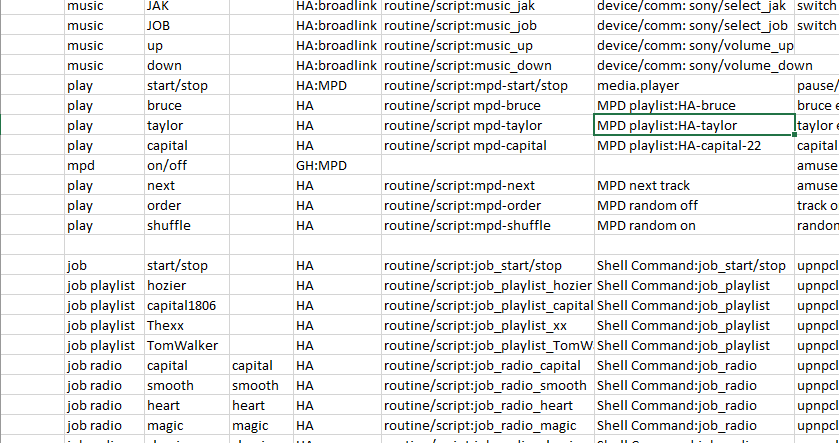
It is easy to get carried away add functions, which I wont use.  For voice control it is even easier to add commands which I don't remember so I cant use.  The sensible way forward is to limit voice control to frequently used functions such as playing radio stations and changing the volume.  I set them up in a spreadsheet so that I can keep track of what is available to me.


I should also mention that Google Assistant provides an alternative to many web browser functions.  I can easily ask it for the weather forecast, information and news, although it is more difficult to phrase requests so that I get something meaningful.
Perhaps the most useful function is "hey google, where is my phone" which causes my phone to ring.


Wednesday, 18 May 2022

HA: Light Bulb Colour Patterns

 IoT devices can usually be controlled from their own app, from Google Home (GH) and Home Assistant (HA), each method has its own features.  I expect the app to have the best level of control, and a subset of that to be available when linked to GH.  HA features are implemented by the community and are typically much better than GH.  For my FCMILA cheapo coloured lightbulb the Tuya / Smart Life app doesn't allow you to do very much.  There is one "scene" called "gorgeous" which displays an pleasing range of colours but it isn't available on GH or HA.  This lead me to investigate the ability to set up HA to display a sequence of colours.

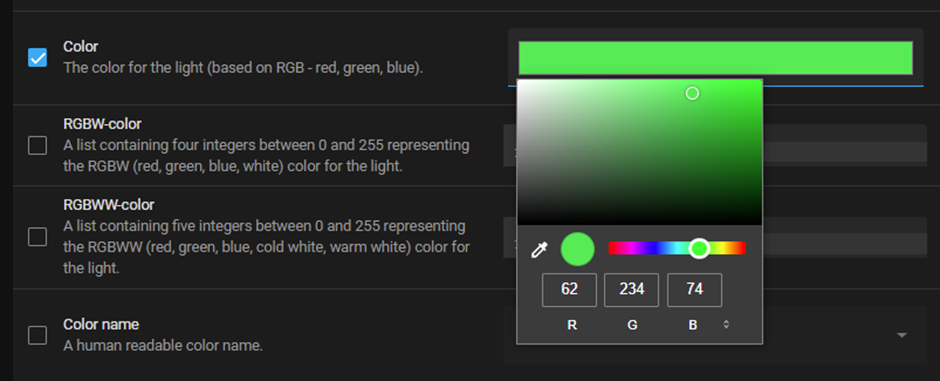
Looking at HA Developer tools/state you can see the current configured parameters for the bulb.  Within Developer Tools/ services you can can configure and test a service to turn the light on with a colour of your choice.


It is now simple to create a script calling this service so that the bulb colour can be changed.  At this stage we want to set up a sequence of colour changes.  It is easier to do this in text mode rather than the user interface.  We simply edit a script which causes a single colour to be displayed and copy/repeat the text for each colour we want.  We change the RGB colour values to  the ones we want and then add a delay action between each section.  We now have a script which displays a sequence of colours, each for 1 second.  Finally we need to add a loop to the script.  Looking at the scripting documentation I setup a "for loop" script in which I can specify how many times the sequence will be displayed.


The completed script can be run from the dashboard or exported to Google Home via Home Assistant cloud so that it can be run with a voice command.