Monday 22 July 2024

Message Board app

 Intro

I am not at all sure why I felt the need to create a message board, but I did.
The idea is to have a screen or window showing any "events" occuring on home IT systems.
I am not sure what systems will post events on the message board.
Anyway I went ahead on the basis that I might find it useful.

Design

It should be possible to see the board on a phone, iPad or PC so a web application is most sensible.  The display should update automatically as new events arrive.

Messages should be send from home IT systems but I will include the ability to add messages through a web front end.
  
As usual the web page will retrieve information from a server using JavaScript.  Previously I have used a python back-end or php to provide server functions but I have an urge to use a proper Javascript server for which I will install Node.JS.

Messages will be stored on the server in a file or MySQL database.

The concept and design are both somewhat vague so I expect the design to evolve.

Plan

1    Install node.js and establish communication from a URL.

2    Provide the ability to add simple messages and view them

3    Create a database for the messages and functions to add / view messages

4    Create message board web page to view appropriate information regarding events

5    Provide ability to add and delete events through the web page

6    Set the application to be always available.

Node.JS

Node.js runs on a server and provides the ability to run javascript.  It is used extensively to implement functions which communicate with browsers to display web pages.  As we want our messages to be held centrally they need to be stored on a server node will be responsible for adding messages and sending out message details.

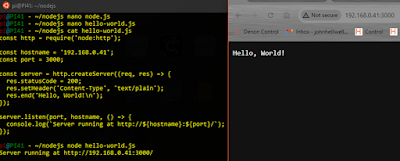
Node is installed on an RPI.  Installation doesn't use the apt packet manager but is quite straightforward.
The server is started from a command line and runs on port 3000 (which is pretty standard).  A "hello world" app quickly demonstrates whether it is working.
A HTTP server object is created using the "http" module and then setup to listen for user input.
When a URL request is received the eponymous message is returned and displayed as a primitive web page - without headers or surrounding HTML.

Next we make sure we can transfer information in URL parameters to tell the server what we want.
The URL module is added making it very easy to retrieve URL parameters from the HTTP server into the script.  In the example below the "req" object has values req.year and req.month which contain values submitted from the "user".


We can now setup our first prototype message board. There are two operations "op=view" and "op=add".  For the "add" operation the second argument is "mess=<message text>".
JS to achieve this is simple and we can easily add and view records.
The fs module is used to append "add" messages to a file, then used to read the file and send "view" output to the browser.

MySQL database

Using files isn't going to be sensible for my message board, I need a simple database, with each record being the fields required for a message.  I create a simple database "messages" with a single table "mess" including fields for the message, system, severity, date, closed-flag.


Now we can use the mysql module to add or view records.

Initially a connection "con" is created to the messages database on the database server.
We then create a text string "sql" which is a SQL command to insert a record into the "mess" table and use the con.query method to submit the command to MySQL.  Providing there is no error ("err"=false) we return an empty page to the user.After a little tweaking of the database permissions I am able to add records to the database successfully


Similarly if we want to view the messages table we submit a "select" command which returns the appropriate rows/fields in an array ("result").  We can then select suitable rows / fields to display.
The first test simply shows the message "body" for the first two rows.  This information is encoded into a HTML page and returned to the browser for display.

Web Page

We now have the ability to use http requests with parameters, files and database tables.  We can instruct node.js to add records and to give us a list of records to display.
We are ready to set up a web page containing the message board.  Initially I considered that I would use node.js to provide messages and then format / display them in the browser.  However it makes much more sense to simply create a web page in node.js and send it to the browser.

The bare bones of the page are saved files header.html and footer.html (trivial) on the server and a list of messages is shown in between.  Usually node.js works asynchronously so you are not guaranteed to hae the template files available when you need them.  To me as a newbie this is confusing.  Kinsta provided an excellent explanation for me so that I could read in header and footer files ready for building the web page.


Next I need the ability to add and remove records from the message board.  Normally I expect the records to be provided from other home-based computer systems, but the capability to add records through the webpage is useful.
I can add a form to my header file and use it to submit an "op=add" http request to the server.


Finally I add a "close" link to each message so that I can remove a message from the board.  A new http request "op=close" causes a SQL DELETE command to be sent which removes the record from the database.


The example below shows the URL which is sent to node.js when the user clicks on the close link for message id=14


Conclusion


We now have a working webpage which allows us to look at the message board or add / remove messages.  It is still very much a prototype but we have the necessary components in place and working.  Node.js has prooved its worth and I have been able to create practical server app bringing together javascript, SQL, http and html.

As a second stage I want to set up a message screen using an old phone as a monitor start to notify the message board of suitable system events, for example: disk full, device down, low battery.


Wednesday 3 July 2024

Rooting : What is the point?

The Question

I was considering rooting the HTC One M8 mobile for some time - I am not sure why!
One reason was that I knew HTC were amenable to unlocking.  Another was that I believe rooting is less popular / possible than it used to be so it may not be something I could do for much longer.
Despite my interest I couldn't see a compelling reason for rooting and finally decided that I would have to try it out to find out if / how it was useful.
Now that I have successfully rooted HTC, I need to find out why!

Common Uses

There are lots of articles with lists of apps for rooted phones.  A lot of them are very old, but a long list from techlog360 is helpful. 

There are many apps to change the UI look and feel and also many more to manage rooting requirements.

Some common uses (with examples in brackets) shown below may well be useful if your mobile is your primary phone, but dont interest me.

1    Remove Bloatware (SystemAppRemover)
2    Improved backup (Titanium backup)
3    Enhance Battery Life (Greenify)
4    File Recovery (Disk Digger)
5    Automate some phone operations (Tasker)
6    Ad Blocker (Adaway)

Ones that I may investigate further

1    Improved file manager (Solid Explorer File Manager)
2    Toolbox (3C All-in-one Toolbox)
3    Web Server (KSWEB)
4    A full Linux GUI Environment (UserLAnd)

Many of these apps are available on the Google Play store.  Often they can function without ROOT capabilities but work better as root.  I haven't checked whether they all work with a HTC One M8.

Alternative App Store

For apps that are not available on Google Play, you can install from an alternative App Store or side load them.  F-Droid appears to be a popular Open Source Store, it isn't available on Google Play so I needed to sideload it which turned out to be very easy.

Step 1 is to download a ".apk" file for F-Droid from its website.  You then click on the file in the download folder and you are asked if you want to install an app from an unapproved source.  Android is somewhat sniffy but allows the install to proceed.  F-Droid can now be used to search for and install other apps.
The only issue I had was that I couldn't access the F-Droid website using https and had to use http: to complete a download on HTC.  The reason, apparently, is that the HTC Android certificate for LetsEncrypt is too old.  I expect a number of these little issues as I proceed.

Command Line

A good starting point for investigations is to work with a Linux shell.  The command line allows you to find your way around the system.   No linux shell is provided so I needed to download a terminal emulator, of which there are many available. Initially I tried Termux, which is very popular and has useful add-ons.  However, it doesn't currently work on HTC due to a bug with the bootstrap component.  Instead I installed Another Term without any issues.


Another Term (AT) works better in landscape mode, otherwise the keys are rather small.  Starting AT you see a familiar command prompt and can start to execute Linux commands.  Type "su" and SuperSU will permit you to change to root privileges, this confirms we can use our root access.

Although AT provides a reasonable shell, the keyboard is small and the screen is very small. 
What we need is remote access.  I looked at the play store and found SSH / SFTP server which seems to have plenty of users.  It installs without problems to HTC.  Once I have setup a user I can start the server and SSH into HTC from WSL as shown below.  Now I start to think of HTC as a computer not a phone.

A quick look at Linux

Signing on via SSH I see that I am assigned a userid u0_a140.
The "df" command shows most of the Android disk layout which is very different from Linux.
Operating System files are stored in /system, applications use /data.
I dont have permissions to list directories.
The commands are cutdown, for example ls is missing most options and there is no man command.
Looking at "user" processes running I can see that there is a separate process for each app which is running.

If I switch to root I can see the disk layout a bit better.  I can also see that /system has some familiar directories and /data/data appears to have storage for each app.

Conclusion

Android is very different from Linux distributions although the basic commands used to control it are the same.  Naturally, it puts no emphasis on making the command line user friendly as its purpose is to manage all the processes running on the phone.  Even though this review was very limited, it gives an idea that we are looking at a complex system managing many functions whilst I am having a look around its innards.

We have now established that we can use a rooted system and have a slightly better understanding of what Android is / does.  However, apart from being able to look at the file structure and files, I havent done anything which requires root privileges.

I need to do more before we can agree that it is useful to have a rooted phone.