Sunday, 30 June 2024

Zabuto Exercise Calendar

 Intro

A monthly calendar on which you tick off the days is an excellent motivator.  I want encouragement to exercise daily; in particular my knees need some TLC to make them more mobile.

Of course a printed calendar allows you to do this by crossing off the days when you exercise.  Alternatively any calendar app will allow you to log this type of information as appointments.

I want the convenience of a printed calendar without the need to carry it around with me.  I also dont want the hassle of typing in calendar entries on the computer or phone.

My conceptual answer is to display this months calendar on a web app which works on phone, iPad or PC.  Clicking on a date will turn that day green.  As the days go, and I complete my exercises, the days turn green.

Here is a sneak preview of the completed calendar.


Design

The web page should be based on HTML and Javascript so that I am able to program its look and behaviour.
After some searching on Github I found Zabuto.  It is a straightforward JS, Jquery, Bootstrap, Html, CSS app.


There is a great demo which shows you how the features work and it is easy to copy the demo to a web server.  It runs straight away without faffing around.
Days can be coloured / highlighted easily.  There are event handlers which allow you to add processing when a day is clicked.  You can load infromation into the calendar from files.

I need to save calendar information.  My preferred way to do this is to use SQL and PHP as previously used for my Art database based on Tania Rascia's excellent tutorial.
I expect the final solution to require two clicks daily, one click on a home page icon to show this month and a second click (if exercise has been completed) on today's date to mark it complete and turn it green.

More sophisticated processing and recording ideas are possible - for example, to provide more info on exercise completed to to notify that that exercise is needed - but this can wait for a subsequent upgrade if necessary.

Build

I started off by putting the demo application on my RPI web server (PI40) and checking that it works.  I then removed all files and folders from the app except those which are referenced in index.html, that just left a few JS, CSS and HTML files and the app continued to work as expected.

I also need a database.  Using my favorite HeidiSQL I setup a simple database record.


"whenisit" is set up as a index field so that there can only be one record for each day.  At present I only utilise a single "complete" flag field, but I could add more info later if I want more detail on what I did.

Starting from this minimalist calendar I added some entries in different formats to find one I like.

Clicking on a date causes the date to have the "event-john-complete" class added and causes the cell to turn green.  In practice I made it a toggle so I can "uncomplete" the event if I made a mistake.  Using JQuery this is a single line command.


At the same time I need to update the database record to show completion.  If there is no record for that date I create one by using the REPLACE command.  This required some thought (because my SQL knowledge is minimal) but when it is working it is very simple.  We make JQery AJAX call to SQL and update / create the record in a single statement.

Finally, I decided to set all dates upto today in the current month to have a pink background when the page is loaded.  This is followed by a read of database records to mark any completed days as green.  Days in the future have a white background.

Finale

Job Done.  I have a simple calendar which encourages me to exercise.  So far the application is working, which means that am actually using it to make my exercise more regular.😄


Saturday, 29 June 2024

Root an Android Phone

Rationale

Rooting is a technique for circumventing the security on a phone / tablet giving more capabilities / permissions to access the Operating System and hardware.


For a long while I have been intrigued as to whether it would be worthwhile to "root" an old phone.
Improved backups, fonts and display customization, file recovery, improved battery life, removing bloatware appear to be common reasons for rooting.  None of them particularly appeal to me.

I have an old phone, an HTC One M8 which I intend to root.  It is a particularly good choice as HTC support(ed) the rooting process rather than trying to prevent it.  As it is an old phone rooting may allow me to install software which has subsequently become unavailable in the app store.
I hope to find other advantages as I proceed.

Overview

Clearly mobile phone vendors dont want just anybody to be able to modify OS software on their phones.  When the phone is powered on a program called "bootloader" copies the Android OS into memory and starts it running.  By default you are not allowed to change the program which bootloader runs so it should always start Android.

HTC provide instructions to "unlock" the bootloader.  You obtain an "identification" key from your phone, send it to HTC and they provide you with an unlock code.  After you flash this code to your phone your bootloader is unlocked.

Next you need to use a "custom recovery program" which will allow you to modify OS files.  As the bootloader is unlocked you can flash TWRP (TeamWin Recovery Program) to the HTC and call it  "recovery.img".  You can then start recovery.

The final step is telling the recovery program to execute a zip file SuperSU.zip.  This is the actual "rooting" step which will update Android files so that you can be a  "root" superuser whenever you need to.

After completing this process you boot the phone normally then, when necessary you use the SuperSU app to provide extra permissions.

The rooting process relies on the skills of the community to provide a recovery program and Android superuser modifications.

Installation : Unlock the bootloader

I found an excellent video by Sakitech which goes through the unlocking / rooting process in detail.  The phone is at least ten years old and the video was uploaded in May 2013 so I was apprehensive about whether the process would work.

The first tool you need is the "Android Debug Bridge" (ADB) which allows the PC to communicate with the phone via a USB cable.  You download the Android SDK and find it is located in the platform-tools folder.  You can delete the rest of the SDK if you want.

On the HTC you enable the developer options (see left for details) and you can then set the "USB debugging" option on.

Next you boot the phone in fastboot mode by holding the "volume down" button and pressing "power".   The fastboot menu shown on the right is displayed.  You should have the HTC attached to the PC with a USB cable.
Now the HTC is ready to communicate and you run the ADB fastboot program on the PC.  Initially the fastboot program wouldn't talk to the HTC, until I installed  the ADB driver for my HTC android device.

Using the fastboot program I was able to obtain the "identifier code" and send it to HTC who returned the unlock code.  HTC provide excellent clear instructions to help you do this. 


You then flash Unlock_code.bin to HTC and the bootloader is unlocked.  The phone resets itself to factory defaults, all data is erased and it reboots.  It takes a few minutes to do this.
If you reboot in fastboot mode you can see that the phone says it is "unlocked".


Installation : Custom recovery and Superuser


The bootloader is unlocked now so we can find some more programs to help us.

The first is TWRP (Team Win Recovery Program) which is a program you can boot from the HTC flash to carry out various recovery functions.  The video instructions recommended a program called clockworkmod but this was discontinued in about 2015 and TWRP seems to be a popular replacement.

The second is a package called  SuperSU which modifies appropriate Android files to allow you to be a superuser / admin / root / su.
We download SuperSU.zip from the SuperSU website to the root folder of the phone using the HTC normally booted.

We download the TWRP image to the PC and then use fastboot to copy it to HTC flash with the name recovery.img.  Now, in the bootloader menu, we select RECOVERY and boot the TWRP recovery.img file.

We then use RECOVERY to install SuperSU.zip.  This patches the OS image so that we can have root access.  Next time we boot HTC we have a new "SuperSU icon.  We can look at the settings to check that the phone is successfully rooted.


Success! We have rooted our HTC One M8.
Next I need to find out what the point of this exercise was.  What can I now do that I couldn't do before that is useful?

Monday, 10 June 2024

Roberts Radio

Intro

I have recently been having some success in controlling music systems in the house.  I use web pages which allow me to tailor the choice of music and the way it is played.  Although android/iOS apps are available they require some faffing around to achieve resukts and each of them is different.  A web page has just the options I want to use and it is easy to select albums or stream music from my home server.  Previously I have set up the ability to control Denon amplifier, Sonos speakers and Pure Jongo devices.

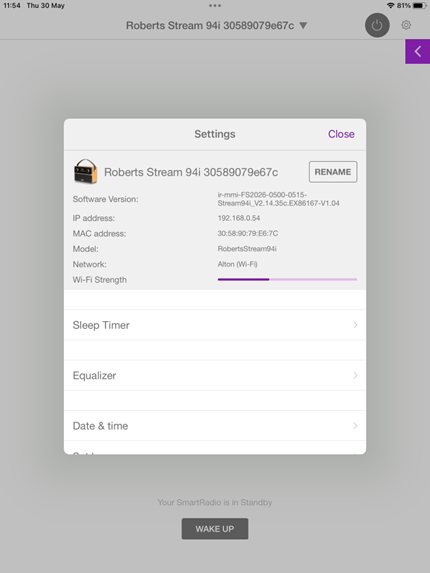
The last remaining music device which would benefit from home control is a Roberts Radio 94i.  It is a portable radio with wifi interface for music streaming.  My Home Assistant system recognises the radio but doesnt allow me to do much more than turn it on or off.


PoC

Until recently I thought that there wasn't an app to provide remote control, then I came across UNDOK, which is recommended by Roberts and allows you to do all the necessary functions from an iPad.


Roberts don't provide documentation on commands to program the radio.  Functionality is provided a by Frontier Silicon chip and although there isn't a specification, some people have managed to reverse engineer their software api so that FS devices can be controlled.

I have had a lot of success recently using a TP-link monitor port and an iPad ethernet cable which allow me to monitor network traffic from the iPad using wireshark.  I started monitoring UNDOK traffic between the iPad (192.168.0.200) and Roberts Radio  (192.168.0.54) and found that communication uses HTTP GET commands with XML responses.


HTTP GET commands are easy to use, you can enter them directly into a browser and see the response, for example the power off command puts Roberts into standby and gives an "FS_OK" response:


I was hoping to use Javascript for programming but I soon fell foul of CORS (Cross-Origin Resource Sharing) as the Roberts Radio  (RR) doesn't permit it (perfectly normal) and I quickly decided to use a python back-end which generally works well for me.

After a little experimentation I found that the fsapi-tools python library "fsapi.net" establsihes communication easily with RR:


I found that it doesn't have all the functionality I want, in particular I am unable to view or change presets using fsapi.net.  
For more general controls we can use the HTTP GET requests which we identified in Wireshark.
To do this we use python “requests” library to submit a request.
Since the output is in XML format we use “xmltodict” to decode the XML response.


Programming


As usual we setup a python command with arguments to define the request.  The response from python is a print statement formatted as XML to pass back to the web page:
Using the fsapi.net api programming for power (and volume) is very simple:
To view / change the preset we use a HTTP GET request:

Now we can set up a web page to control Roberts:
In Javascript we can invoke the python commands using websockets.  For example four commands are issued to update the power/volume/muted/preset current status:
Python responses are received back via the web socket and processed in Javascript to update the web page:

Conclusion


It isn't a simple task to program device apis.  However the use of wireshark to decode what apps are sending to the devices is much much easier than looking at api specifications.  I wouldn't have been able to work out how to control the Roberts Radio without looking in detail at how UNDOK manages it.


Bonjour

I want a solution to enable to access a webpage on a local webserver without typing an ip address or using a domain name.

Using DNS allows you to setup URLs associated with a sub-domain name, for example:
john.helliwell.org can be redirected to 192.168.0.40/home/index.html.
Although this is commonly used for internet locations, it works for local web pages as well.

Apple Bonjour provides a convenient way of accessing local devices and services without having to type in IP addresses, for example PI41.local can be used as an address for my local raspberry pi instead of 192.168.0.41.

In addition to working on Apple Bonjour (aka zeroconf, mDNSresponder, avahi) also works on Windows, Linux and on Android (version 12 and above).

I configured Avahi on my raspberry pi with an address kitchen.local

Typing "kitchen.local" in a browser now redirects to the PI41 homepage.
I actually want a specific web page when "kitchen.local" is entered.  To achieve this I configure the lighttpd web server software so that if the URL "kitchen.local" is received the user is redirected to /var/www/kitchen/index.html.
Now the user sees a web page tailored for the kitchen:


This is a simple solution to avoid using DNS redirects.  I am not sure if it will have wider uses but it could be useful to add more local addresses.

Wednesday, 5 June 2024

Acorn System 1

 In 1979 I was studying for my Computer Science degree in Cambridge.  One term we had a practical lab where we programmed a simple microprocessor board using a numeric keypad.  I have a lasting memory, tinged with a large dollop of regret, that I made little progress with the lab exercises, even though I was familiar with the ideas from my time working at British Aircraft Corporation (now BAe) the previous year.  

Over the years I have occasionally wondered which board we used.  The only specific detail I remembered was that I found it impossible to read the manual.  This is because it was written entirely in capital letters which were tightly packed.  I reckon this is how dyslexia feels.  Individual letters are clear, words are visible and by careful scrutiny sentences can gradually be detected but the overall effect is totally unreadable.

At a visit to the Centre for Computer History in Cambridge I was fascinated to see a display cabinet containing a couple of microcontroller boards resembling the one I used all those years ago.  They are the MK14 and the Acorn System 1.


On returning home I tracked down the manuals and was pleased to find that the Acorn System 1 manual is indeed all upper case and just as difficult to read as it was 45 years ago.


The CCH description of the board tells us that it was designed by Sophie Wilson in 1979 and cost £81.  Sophie is a couple of months older than me and was two years ahead at Cambridge so this may well have been her first product.  I wish she could have written the manual in mixed case!  Of course Sophie has gone on to achieve fame as the designer of the BBC microcomputer and ARM RISC chips.

As demonstrated by many blog entries the 6502 is my favorite legacy microcontroller.  It would be possible for me to buy a System 1 kit from Chris Oddy who is a long time fan / user.