Thursday, 31 March 2022

Google Home

I am well behind the curve when it comes to talking to the internet.  Both Harry and Alex use Alexa for various tasks at home but I haven't felt a urge to follow in their footsteps.  Back in December I made an impulse buy of a Google Nest Mini (v1) at the supermarket for a special price of £20.  I finally got around to installing ("playing with"?)  this week and I am rather impressed.  In fact I combined this with two other impulse buys, an RGB controllable bulb (OCT18, £11) and some Sonoff smart power switches (SEP20, 4 x £8).

As expected the Nest Mini is easy to install using Google Home and my wifi network.  It listens carefully to what I say and I can speak in a normal voice, not slowly or shouting.  It has good accuracy understanding what I say, even if there is background music.  It has a switch so I can turn off the microphone if I want.


Straight away I can ask it to play radio stations, which I like as I often change my mind what I want to listen to.  When I ask Nest to play music she tells me I need YouTube premium (or Spotify Premium) to play specific songs but she chooses a playlist of appropriate music instead which she plays (including adverts).  

Next I set up my Fcmila RGB Bulb in the recommended app SmartLife on my phone and linked the app to Google so that I can turn the light on and off and change colours by speaking to Google.  I think it knows quite a few colours - it will be a good game to see how many colours are recognised.


I tried setting up our Samsung TV (QE55Q65T series) in Google Home but it was rather dull, it is about 3 years old and doesn't have full integration with Google / Alexa.  I can change the volume, change source, turn on/off.  Virgin Media integration is even less, they have a trial for integration in 3 UK locations, and you will have to pay for the privilege.
Harry has an Amazon "Firecube" which he can use to control his TV properly but I am not that fussed.

The last connection I tried was with Sonoff S26 smart switches.  I set them up in the recommended app ewelink on my iPad so that I can control them.  I can then give them names, link from ewelink to Google and use Google home to turn them on / off.


Of course I can use Google Home and speak to my phone in the same way as the Nest to achieve the same effects so I am not restricted to a single room.  I expect I will also start asking for internet information to see how easy / helpful it is to find things out verbally.

In conclusion, I must say that I like the Nest Mini.  With a minimal level of frustration I have managed to set up a number of devices and Google is very good at understanding what I want her to do.


Risc-v Debian Linux Build for LicheeRV dock

 I am a long way from being able to build my own linux system.  A lot of the discussion on the techie telegram forum for Nezha/Allwinner RISC-V has centred on the tasks and software required to get to the stage where linux can boot.  A great article by Andreas entitled Building boot software an Debian from sources for a RISC-V board (Sipeed Lichee RV with D1 processor) does exactly what it say it will.  Even better it contains both detailed instructions for every step and a copy of the final build.  The final product is a good working Linux system (apart from an HDMI issue) with a recent kernel which can be used normally and is updatable.

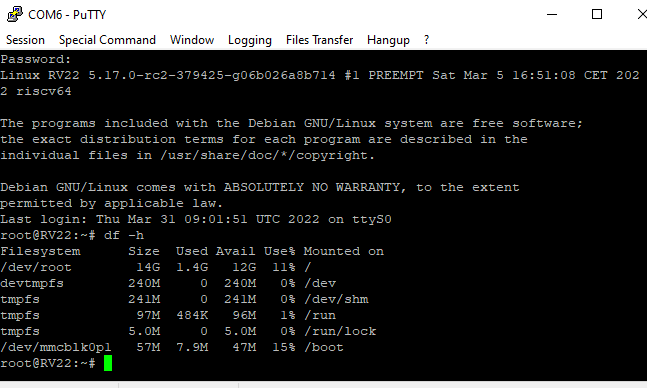
Initially I followed instructions to create an SD card from software binaries / kernel and a rootfs.  It starts up cleanly.

 A lot of informational messages from the various boot stages are displayed which sheds some light on what is being done during the various boot stages.


"The Long Story" is a detailed list of commands used to build the system, clearly explaining how to do it and showing specific software repositories from which to obtain the components.


  I believe my build environment didn't quite match the author's.  He suggested Debian Bullseye (11) as a starting point with 2GB RAM and 20GB disk.  I tried an RPI, WSL and Debian/AMD64.  I believe I had all the steps working but could not get them all to work on the same machine.  In the end I stopped.  I have the software, I know what was built and and I know how it was built.  So it is a very satisfying achievement.


Monday, 28 March 2022

RISC-V: Initialisation and C run-time

Start Simple

Our simplest assembly program simply exits cleanly, calling Linux to return to the Operating System.  We can assemble it to an object module and link it as an executable successfully.  We check it works by testing the return code.


Save Return Address and pass Arguments across

When we write C programs there is an initialisation routine which is usually called something like crt0.s, which carries out initialisation for us.  My starting point for crt0.s is a program which saves the return address in the stack, which has already been setup for us.  As we exit the program using an OS call this isn't really necessary but I feel this is a good thing to do.
Next we can initialise the command line arguments which are passed  from the OS in the stack.  We put them in argument registers a0 and a1.  We can now call the C function main.c. 
Providing my main.c program doesn't contain any clib subroutine calls it should work as the sample below shows.  crt0.s calls main.c to add up a few numbers.  main.c returns the answer which crt0.s passes back to linux in the return code.


This is very good, we simply have two object modules crt0.o and main.o linked together into an executable which runs.  In fact I don't think we need to save the return address or setup args in crt0, we can just call a "pure" C function and it will run.  Our main.c function can make linux syscalls, but isn't allowed to use clib (stdio.h etc).  

Using assembly subroutines to do I/O for my C program

The example below shows a main.c module which has command line arguments passed to it from crt0.s and calls my own assembly write.s subroutine to display the first command line argument - which is the name of the invoking command  ./crt0.


Conclusion

The next logical step is to make our own library of c functions.  On previous occasions I have tried to build / use newlib, but without success.  The situation remains unchanged.  I think I have found a better newlib version to use but I would be advised to try building it on ARM before RISC-V.

However, we have made excellent progress and have a better understanding of the C environment.


RISC-V Programs

I  bought my Nezha back in June 2021.  Of course the reason for buying it was the RISC-V (RV) instruction set, so to make it worthwhile I needed to write some assembly programs.  I learned assembly mainly from Anthony J Dos Reis's book which I started last October.  I wrote a few I/O routines then, and have been slow to follow up but I have gradually made progress.

Part of the problem is that C is an easier language for "low-level" program and the use of Assembly is somewhat artificial.  One solution is to use assembly to look at our programming environment provided by Linux, we can more easily look at registers and memory in Assembly.  Another solution is to look closely at how the C and assembly environments work together, which I shall cover in a subsequent post.

I am unsure how much to use clib subroutines in my program.  They provide me with all the functionality of the C standard functions.  At best it saves me time writing lots of low-level subroutines, at worst it means that I might as well be writing C.

Display registers and addresses

My first program (memdisp1) simply displayed the contents of some particular registers and label addresses within the program itself.  I used clib printf to display register values but found that it only prints 32-bit values.  This meant that addresses were incomplete, I could shift right to get the remaining hex digits.  It turns out that there are 6 more bits to be read.


From the output we can see that the program entry point (main) is at 2A,DA2E,66D4 and the stack pointer is at 3F,FFDA,E490.  A 32-bit address gives a potential range of 4GB and 6 extra bits multiply that by 64 to 256GB, although of course we dont have that much memory.  In practice linux will assign an appropriate set of memory pages to the process.  It is more important for us to know where in the stack our data is and what offset in the program our instructions are.

Display register values properly


As printf doesn't do a good job of printing my 64-bit registers (there may be a compilation setting I am missing which limits results to 32-bit) I wrote an assembly program (memdisp2) to print a register value by selecting the rightmost 4 bits and printing the corresponding hex digit.  The program loops round shift right 4 bits each time until all the digits have been printed.
As there are no C lib calls in this program we don't need the overhead of C initialisation and the program is a lot smaller1408B compared tih 8584B


Display a range of memory


We now have the tools to print out a decent memory dump within our program.  The code to display a 64 bit register goes in a routine disp64.  We put the code to display a range of addresses in another subroutine disprange, so that it can be used generally.  Memdisp4 simply calls disprange to display some values.


The result looks pretty good to me.  We could also use the debugger (GDB) to get this type of information but it is handy to be able to dump it within our program. The program is loaded at a different location each time it is run and to understand more about the linking and loading process I would be delving further into Linux rather than RV assembler.


RISC-V : Learning Assembly


Study Texts

I read a book RISC-V Assembly Language by Anthony J Dos Reis to learn RISC-V (RV).  The book assumes you don't have any prior experience with assembly language and some parts are rather slow and obvious to me.  However it pays to read through in detail as there is a lot of important information included.
One downside of the book is that the examples use an assembler "rv" written by the author, which runs on Windows.  Of necessity, time is devoted to the way it works.  As I am using a real RV computer I would prefer focussing on the real environment.  I agree that Reis's "rv" assembler makes it much easier for most people to get started, as I am rather unusual / fortunate in having a real linux RV system.

 I also used the definitive RISC-V Reader, written by the architects, David Paterson and Andrew Waterman.  This highlights the rational elegance of the language and compares it with older CISC (Intel) and RISC (ARM) architectures.  The language can be summarised in a very few pages - although this doesn't help a lot in learning it.

Machine Code

The Reis book focuses on RV32I 32-bit base instruction set.  There are cutdown versions for 16 bit as well as 64-bit and 128-bit varieties. My computer is 64-bit  but runs the 32-bit instruction set mostly.  There are a few extra instructions for 64-bit systems but they are just natural extensions.  For example the LW instruction loads a 32-bit word into a 32 or 64 bit register and LD loads a 64-bit word into a 64-bit register.  One of the strengths of RV is you should be able to program a wide variety of devices with, mostly, the same instruction set.

There are various standard fields in a machine code instruction.  Care has been taken to put the fields in the same place within all instructions wherever possible, in fact there are only 6 different formats.  This makes the hardware simpler and assists pipelining.


All instructions are 32 bits in length with the opcode in the right-hand 7 bits.  This helps quick identification of  an instructions purpose when looking at machine code.
There are 32 registers which are divided into groups for different purposes such as temporary, saved, function arguments.  Stack pointer, return address and global pointer registers have specific uses.
In total there are only about 60 instructions covering the expected operations such as load, store, branch, add, shift and logical operations.

Assembly Language

Using a small instruction set makes learning the basic operations of loading, storing, adding, shifting, looping and branching very simple.
As RV machines don't have a status word some things need to be processed somewhat differently.  The result of comparison operations is put into a register; the programmer needs to test for overflow conditions themselves.

A sample program is shown below:


The subroutine mechanism requires you to save the return address on the stack when you enter a subroutine (assuming you want to be able to call other subroutines) and in practice the stack can be used for most of the storage required in the program.
There is a convention that "callee" registers, s0-s11 need to be saved within your subroutine if you modify them.  Temporary registers and argument registers are assumed to be overwritten across a subroutine call, so if the calling program needs them it is responsible for saving them.
This is a nice mechanism to minimise unnecessary save / restore overhead for subroutines.

Pseudo Instructions

Pseudo instructions pad out the instruction set.  For example there is a BLT (branch if less than) but no  BGT (branch if greater than) instructions.  You can code BGT t0, t1, done-label and the assembler translates to BLT t1, t0, done-label.  A NOP (no operation) pseudo-instruction is translated to addi x0, x0,0 (add nothing to the read-only x0 register).

Load immediate (LI) and load address (LA) are particularly helpful allowing us to load 32 bit data and addresses.  LI basically uses two instructions: LUI (load unsigned immediate) loads the lower 12 bits and ADDI (add immediate) to add in the upper 20 bits.  There are some wrinkles which the assembler deals with for you.  Similarly LA uses LUI and AUIPC (Add Upper Immediate to PC) and sorts out the complexities for you.

Multiplication and divison

The RV32I instruction set doesn't include multiplication and division instructions but RV32M does.  So if your processor can do multiply and divide you can use the standard instructions, if not you need to implement suitable subroutines such as the shift-add algorithm provided in the study text.

Conclusion

I have just about covered the RV language.  The RISC-V Reader is even shorter than the Reis text book and provides a lot of comparisons with ARM and Intel architecture to justify RV design.  RV seems to have a bright future now that suitable hardware is being developed and sold.  Although not yet competitive with established players it seems likely that it will grow rapidly over the next few years.